Welcome to Connie's Spot

The Above Picture is some of Connie's Spot© Crochet Patterns© All Patterns are Available at my Shop on ETSY Welcome to the Multiple Award-Winning Connie's Spot© & Connie Hughes Designs© Crocheting Blog! Check out Connie's New Endeavor Paper Crafting-Journals!! Now in our 12th Year We Want to Thank All Our Customers/Friends Who Have Helped Us Grow with Thousands of Pattern Sales/Downloads, and Over "ONE MILLION PAGE VIEWS" from All Over the World!!!

If you are new to Connie's Spot© make sure to take the time to follow Connie's Spot© Her Paid Patterns are available at her shop on Etsy. Check out Connie's Spot© Blog Archive of 280+Posts!! That includes Free Crochet Patterns from Connie Hughes Designs© Free Recipes, New Paper Crafting-Journals, Decorating Tips, & Poetry!

As always Connie's Spot© is free of Pop-Ups and Ads...So take your time and explore her blog post archives its loaded with gems...most of all enjoy! Thanks for Visiting Connie's Spot© Blog!!

Connie's Spot© Crocheting & Connie Hughes Designs© Characters, Photo's, Designs & Patterns are All Copyright© Protected All Rights Reserved.

Shop Connies Spot© and Connie Hughes Designs© Crochet Patterns & Handmade Journals on Etsy!!

Shop Connies Spot© and Connie Hughes Designs© Crochet Patterns & Handmade Journals on Etsy!!
Shop Connies Spot© and Connie Hughes Designs© Crochet Patterns & Handmade Journals on Etsy!! https://conniesspot.etsy.comShop Connie's Spot© and Connie Hughes Designs© Crochet Patterns & Handcrafted Journals on Etsy!! Now Over 1000 Sales of Finished Products & Patterns, Plus Over 100 5-Star Reviews!! To All Our Customers Thank You!!! Just Click on the Picture above to take you to my shop on Etsy!

Over ONE MILLION PAGE VIEWS!! To All Our Friends, Followers Customers & Visitors Welcome!!

Connie's Spot© Language Translator

Connie's Spot© Awarded the Feed Spot Top 100 Crochet Blog Award!!

Connie's Spot© Awarded the Feed Spot Top 100 Crochet Blog Award!!
Connie's Spot© Awarded the Feed Spot Top 100 Crochet Blog Award!! I would like to personally congratulate you as your blog Connie's Spot© has been selected by our panelist as one of the Top 100 Crochet Blogs on the Web!!

Connie's Spot© Awarded Top 80 Crochet Blog Award!!

Connie's Spot© Awarded Top 80 Crochet Blog Award!!
"Top 80 Crochet Blogs" By AmsterdamDiary.com: Originality★★★★ Design★★★★★ Social Media★★★★★

Connie's Spot©

Connie's Spot©
Recipient of the One Lovely Blog Award...Thank You Crochet is the Way!!

Monday, May 19, 2014

Free Crochet Agnes Inspired Doll Pattern©

Here's the latest by Connie Hughes Designs©
"Free Crochet Doll Pattern"
Inspired by Agnes of Despicable Me
 She's about 14 inches tall
By Connie Hughes Owner/Designer  
Connie Hughes Designs©
Connie's Spot©
I've been making another doll from my pattern...and I noticed
a few errors...I forgot to
say to decrease your sts as you get up near the neck...and I was
off 1 row of decreasing
sts...so I'm sorry if it confused anybody...I know most crocheter's are able to
see a error and figure it out...I know I have done that...but again
I'm sorry if it had
anyone one confused...and if you see anything else that I've missed, please
feel free to tell me so...Thanks so much, Connie
This Free Pattern is for your Personal use...Do Not Sell This Pattern

Red Heart Yarns Used:
Navy Blue
Tan
Black
Small Amounts of:
White
Grey
Yellow
Red 
Other Materials Used;
Black Eembroidery Floss
5mm Safety Eyes
White Felt
Buttons
Poly-Fill
 
Hooks Used:
F, C, D
 
Abbreviations Used:
hdc-half double crochet
BLO-back loops only
FLO-front loops only
sc-single crochet
FO-Fasten Off
sl st-slip stitch
dec-decrease
sts-stitches
wk-work
st-stitch


With an F hook and white yarn
To make the feet & legs (make 2)

Ch2

Row 1. wk 6sc in the 2nd st from the hook.
Row 2.  2sc in each st, around-12sts.
Row 3. 1sc in 1, 2sc in the next, around-18sts.
Row 4. 1sc in 2sts, 2sc in the next-24sts.
Row 5. 1sc in the FLO in each st-24sts.
Row 6. 1sc in 6sts, 1hdc in 12, 1sc in 6sts.
Row 7. 1sc in 6, dec1 6x, 1sc in 6sts.
Row 8. dec1, 1sc in 3, dec1 4x, 1sc in 3, dec1.
Attach yellow yarn
Row 9. wk 1sc in the FLO.
Row 10. 1sc in each st around-12sts.
Attach tan yarn
Row 11. 1sc in the FLO in each st.
Rows 12-20. 1sc in each st around, FO the 1st leg.
Row 21. Put legs together with a sl st, wk 1sc in the same st as the sl st
and in each st around.
Row 22. wk 1sc in each st around.
Row 23. 1sc in 3sts, 2sc in the next-30sts.
Row 24. 1sc in 4, 2sc in the next st-36sts.
Row 25. 1sc in each st around.
Row 26. 1sc in 5, 2sc, around-42sts.
Row 27. 1sc in 4, dec1, around-36sts.
Row 28. 1sc in 3, dec1, around-30sts.
Row 29. 1sc in each st around.
 
With yellow yarn
Row 30. wk 1sc in each st around.
Switch to grey yarn
Row 31. 1sc in each st, around.
Begin to dec your sts to 24, 18, and finally to 12.
Continue changing colors until you have 5 rows of grey stripes.
But do not FO. Now attach tan yarn.
 

To make the head portion with tan yarn
Row 1. wk 1sc in each st around-12sts
Row 2. wk 1sc in 1st, 2sc in the next-18sts.
Row 3. 1sc in 2, 2sc in the next st-24sts.
Row 4. 1sc in 3, 2sc in the next-30sts.
Row 5. 1sc in 4sts, 2sc, around-36sts.
Row 6. 1sc in 5, 2sc in the next-42sts.
Row 7. 1sc in 6sts, 2sc in the next-48sts.
Row 8. 1sc in 7sts, 2sc in the next-54sts.
Rows 9-22. 1sc in each st around.
Row 23. 1sc in 7, dec1, around.
Row 24. 1sc in 6, dec1.
Row 25. 1sc in 5, dec1.
Row 26. 1sc in 4, dec1.
Row 27. 1sc in 3, dec1.
Row 28. 1sc in 2, dec1.
 
Stuff head and put the eyes in place, around the 14th row, counting
from the neck up. Cut out some round felt pieces. Cut a small slit and slip your
safety eye through it. Between the white felt pieces you should have about
5 or 6 sts between them. Take out stuffing and put the washers in place. I like to stuff
my doll heads last. It makes it easier to do the rest of the sewing. When you have the
eyes in use a little white thread and lightly st the felt pieces down. Even though the head is attached I sewed it down just to make it nice and secure.
 
To make the ears with tan yarn (make2)
Ch2
Row 1. wk 4sc in the 2nd st from the hook.
Row 2. 2sc in each st around-8sts.
Row 3. 1sc in 8 and FO.
 
To make the nose with a C hook
Ch2
wk 3sc in the 2nd st from hook.
1sc in each st and FO.
 
 
To make the arms with tan yarn (make 2)
Ch2
Row 1. wk 5sc in the 2nd st from hook.
Row 2. wk 2sc in each st-10sts.
Rows 3-4. 1sc in each st.
Row 5. wk 2hdc in the next 2sts, 1sc in 8sts.
Row 6. 1sc in each st around.
Row 7. dec1 2x, 1sc in the rest.
Row 8. 1sc in the FLO of 4sts, 1sc under both loops in 6sts.
Row 9. 1sc in 10sts.
Rows 10-18. 1sc in each st around and FO.
With yellow yarn
Ch2
Row 1. wk 6sc in the 2nd st from hook.
Row 2. 2sc in each st around-12sts.
Row 3. change to grey and wk 1sc in each st.
Repeat until you have 2 rows of grey stripes.
FO each arm and slip the arm up inside the sleeve.
Sew each arm to the sides of the body.
 
To make the hair with black yarn
Ch2
Row 1. wk 6sc in the 2nd st from hook.
Row 2. wk 2sc in each st around-12sts.
Repeat rows 3-7 of the head.
Continue to wk 1sc in each st around until
the wig covers the top and sides of the head.
My wig has 19 rows.
 
To make the strands of hair on top (make 5 clusters)
Use a C hook
Ch14
wk 1sl st in the 2nd ch st from the hook and in
each st, ch13 and wk 1sl st across and FO.
Put the wig on and st the hair on top of head and sew in place.
To make the little red scrunchy
Make a ch just big enough to go around the hair strands.
wk 3sc in each st and FO. Sew around the hair strands.
 
To make the overalls with blue yarn
Ch35
Row 1. wk 1sc in each st around.
Rows 2-10. repeat row 1.
Fold the piece in half to find the center, ch3, sl st from the front to the back, ch1
wk 1sc in each st on one side, to make the leg. To make the cuff ch1 wk 1hdc in the BLO of each st. Repeat for the other leg. Each pant leg has about 8 rows. To make the
straps on the overalls. With a D hook, attach yarn to the back bid and wk 1sc in 2sts,ch1 & turn. Repeat until the straps reach over the arms and to the front of the bib.
To make the button holes Ch3 and attach to the other side of strap. Sew small buttons in the front of the bib on both sides.
Attach yarn to the front of the overalls
Wk 1sc in each st across, ch1 & turn.
Repeat until you have about 8 rows and FO.  
For pocket on the front bib, ch 7, wk 1sc in each st, repeat.
Dec1, 1sc in 4stsm dec1 and FO. Sew onto bib.
For the back bib attach yarn and wk 1sc in 8sts repeat until you
have about 8 rows and FO.
With black embroidery floss make eyebrows and st a smile.
 
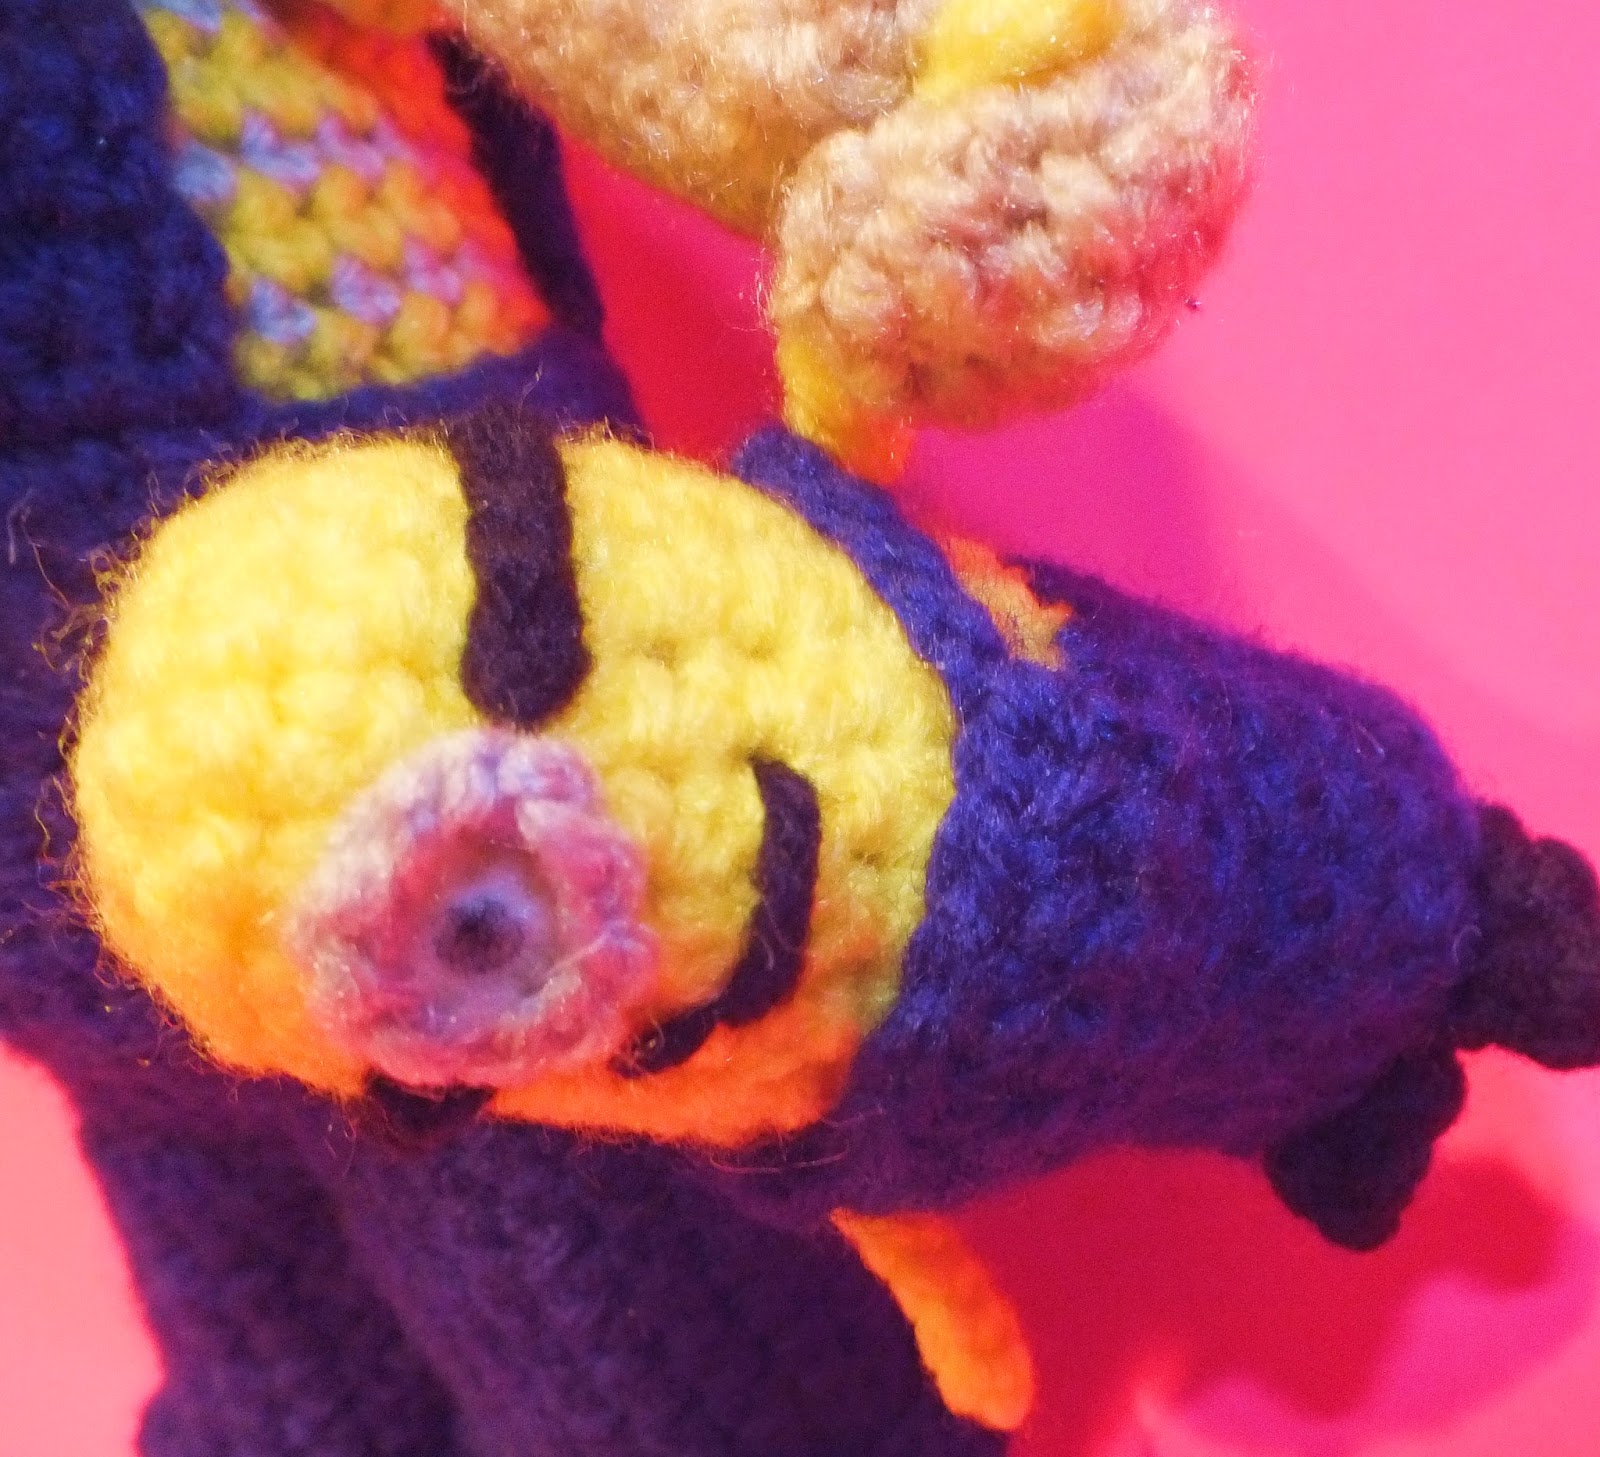
To make the little Minion with yellow yarn and F hook
Ch2
Row 1. wk 6sc in the 2nd st from hook.
Row 2. 2sc in each st around.
Row 3. 1sc in 2sts, 2sc in the next-18sts.
Rows 4-10. 1sc in each st around, change to blue.
Row 11. wk 1sc in the BLO in each st around.
Rows 12-14. 1sc in each st.
Row 15. 1sc in 2sts, dec1, around and stuff.
Row 16. 1sc in 1, dec1 and FO.
 
To make the bib with a D hook (make 2)
Ch7
Wk 1sc in 6sts, repeat 2 more times and FO.
Sew 1 on the front and 1 on the back of overalls.
To make the straps, attach to the back of
the bib with a sl st, ch 6 or 7 ch sts and attach to the
front of the bib.
To make the arms (make 2)
Ch10, wk 1sl st in each ch st and FO.
To make the eye, cut out a small piece of white felt. Stitch or glue
the eye in place. With a black permanent marker make a pupil.
With grey yarn make a ch big enough to go around the eye and sew
in place. With black yarn make the goggle strap by making a ch long enough
to go around head. Sew in place.
To make the shoes (make 2)
Ch4
Wk 1sc in 2sts, 3sc in the last st, 1sc in 2.
1sc in 7sts around and FO.
 
Hope she makes you smile!
Happy Crocheting!!
      Connie            


KimmyShop - Despicable Me 2

No comments:

"Ladies & Gentlemen Journal" Handcrafted by Connie Hughes Now available on my Etsy Shop!

"Ladies & Gentlemen Journal" Handcrafted by Connie Hughes Now available on my Etsy Shop!
"Ladies & Gentlemen Journal" Handcrafted by Connie Hughes, I have to say this is one of my favorites for sure. I really love this one, because it's a great size. Big enough to write on and small enough to carry inside a bag and take it with you. Now available on my Etsy Shop!

"From the Soil to the Soul Fall Harvest Journal" Handcrafted by Connie Hughes

"From the Soil to the Soul Fall Harvest Journal" Handcrafted by Connie Hughes
"From the Soil to the Soul Fall Harvest Journal" Handcrafted by Connie Hughes Fall is upon us, and this handcrafted journal highlights all of the beautiful colors of fall and is dedicated to this wonderful time of the year! Big enough to write on and small enough to carry inside a bag and take it with you. Now available on my Etsy Shop!!

Christmas Snow Globe Journal Handcrafted by Connie Hughes

Christmas Snow Globe Journal Handcrafted by Connie Hughes
This Christmas Snow Globe Journal is just fun to write down Your Holiday Memories, Your Christmas Wishes and More! Now available on my Etsy Shop!

Chef Basil & Rosemary Dolls Pattern© By Connie Hughes Designs©

Chef Basil & Rosemary Dolls Pattern© By Connie Hughes Designs©
If you know someone who loves to cook or loves those chef guys like I do then you will love this super easy pattern... it's just loaded with pictures and easy instructions to follow! Instant Digital Download: 1 PDF included

Crochet Christmas Grinch Inspired Dolls & Chair Pattern© By Connie Hughes Designs©

Crochet Christmas Grinch Inspired Dolls & Chair Pattern© By Connie Hughes Designs©
Who doesn't love this guy and this sweet little girl...and he's got his own Santa Chair to boot! Instant Digital Download: 1 PDF included.

Jingle the Christmas Elf Crochet Doll Pattern© by Connie Hughes Designs©

Jingle the Christmas Elf Crochet Doll Pattern© by Connie Hughes Designs©
Here's Jingle the Christmas Elf© He's 30" tall perfect for display or just for hugging...he's super fun and a little quirky too! Instant Digital Download: 1 PDF included.

The Christmas Mouse Nutcracker & Doll Pattern© by Connie Hughes Designs©

The Christmas Mouse Nutcracker & Doll Pattern© by Connie Hughes Designs©
Christmas Mouse Nutcracker stands about 19” tall…and he really stands on his own! I added a variation so it can be a plushy doll as well. Instant Digital Download: 1 PDF included.

Bells the Christmas Elf Pattern© by Connie Hughes Designs©

Bells the Christmas Elf Pattern© by Connie Hughes Designs©
Why is she called Bells? Because she has bells from the top of her head right down to the tips of her feet! Her face is so sweet and little girls love her! She makes a Great Christmas Decoration as well. Instant Digital Download: 1 PDF included.

Gingerbread Crochet Doll Family Pattern© + Gingerbread Wreath Tutorial by Connie Hughes Designs©

Gingerbread Crochet Doll Family Pattern© + Gingerbread Wreath Tutorial by Connie Hughes Designs©
It just wouldn't be Christmas without Gingerbread...so get your hooks ready...this pattern comes with a picture tutorial for making the Christmas Gingerbread Wreath too...perfect to hang in your kitchen! Instant Digital Download: 1 PDF included.

Chip & Cookie Christmas Gingerbread Doll Pattern© by Connie Hughes Designs©

Chip & Cookie Christmas Gingerbread Doll Pattern© by Connie Hughes Designs©
"Christmas Lantern Pattern" Now Included!! Turn on your ovens it's Gingerbread time. This is "Chip & Cookie Christmas Gingerbread Dolls", and they are 25" Tall!! They are perfect for display, or you can simply make adorable plush dolls...the pattern comes with a step-by-step picture tutorial...and honestly you won't believe how easy they are to make! Instant Digital Download: 1 PDF included.

Crochet Christmas Gingerbread House Connies Portable Doll House Halloween Haunted House Patterns©

Crochet Christmas Gingerbread House Connies Portable Doll House Halloween Haunted House Patterns©
by Connie Hughes Designs© Pattern includes All Three Houses Plus All Crochet Accessories Instant Digital Download: 1 PDF included.

Crochet Christmas Soda Pop Bottle Lantern Patterns© by Connie Hughes Designs©

Crochet Christmas Soda Pop Bottle Lantern Patterns© by Connie Hughes Designs©
Crochet Christmas Lantern Collection! Santa Claus, Snowman and of course an Elf. Instant Digital Download: 1 PDF included

Henry Hugglemonster Inspired Hats Pattern© By Connie Hughes Designs©

Henry Hugglemonster Inspired Hats Pattern© By Connie Hughes Designs©
These hats are all toddler sizes and the little baby one is 3 to 6 months! One pattern makes all 6 of these hats!! Instant Digital Download: 1 PDF included

Caillou Inspired Crochet Doll, Cat & Hat Pattern© By Connie Hughes Designs©

Caillou Inspired Crochet Doll, Cat & Hat Pattern© By Connie Hughes Designs©
It's a Doll, a Hat, and a Cat!! This pattern is all 3 packed into 1. I've had Customers ask me if I would make something for little boys as well as the girls...so I thought that this was a good one since he appeals to both girls & boys! Instant Digital Download: 1 PDF included

Prince Alvary© Princess Amelia© Dolls & the Castle Blanket Pattern© By Connie Hughes Designs©

Prince Alvary© Princess Amelia© Dolls & the Castle Blanket Pattern© By Connie Hughes Designs©
Prince Alvary© Doll Measures 12 ½” Princess Amelia© Doll Measures 11 ½” The Castle Blanket Measures about 28” X 21” This Pattern is for both dolls & the Castle Blanket! Instant Digital Download: 1 PDF included

Spike & Pinky© Monster Rock Band Doll Pattern© + Matching Hats Pattern By Connie Hughes Designs©

Spike & Pinky© Monster Rock Band Doll Pattern© + Matching Hats Pattern By Connie Hughes Designs©
This pattern covers everything pictured above. The Dolls, Guitar, Full Drum Set and the Matching Rocker Monster Hats! Instant Digital Download: 1 PDF included

Handbag Baby Bow Satchel Purse Pattern© By Connie Hughes Designs©

Handbag Baby Bow Satchel Purse Pattern© By Connie Hughes Designs©
Handbag Baby Bow Satchel Purse Pattern© One Pattern Two Unique Purses!! Pattern is Fun-Easy! Perfect for girls ages 4 & Up, Instant Digital Download: 1 PDF included