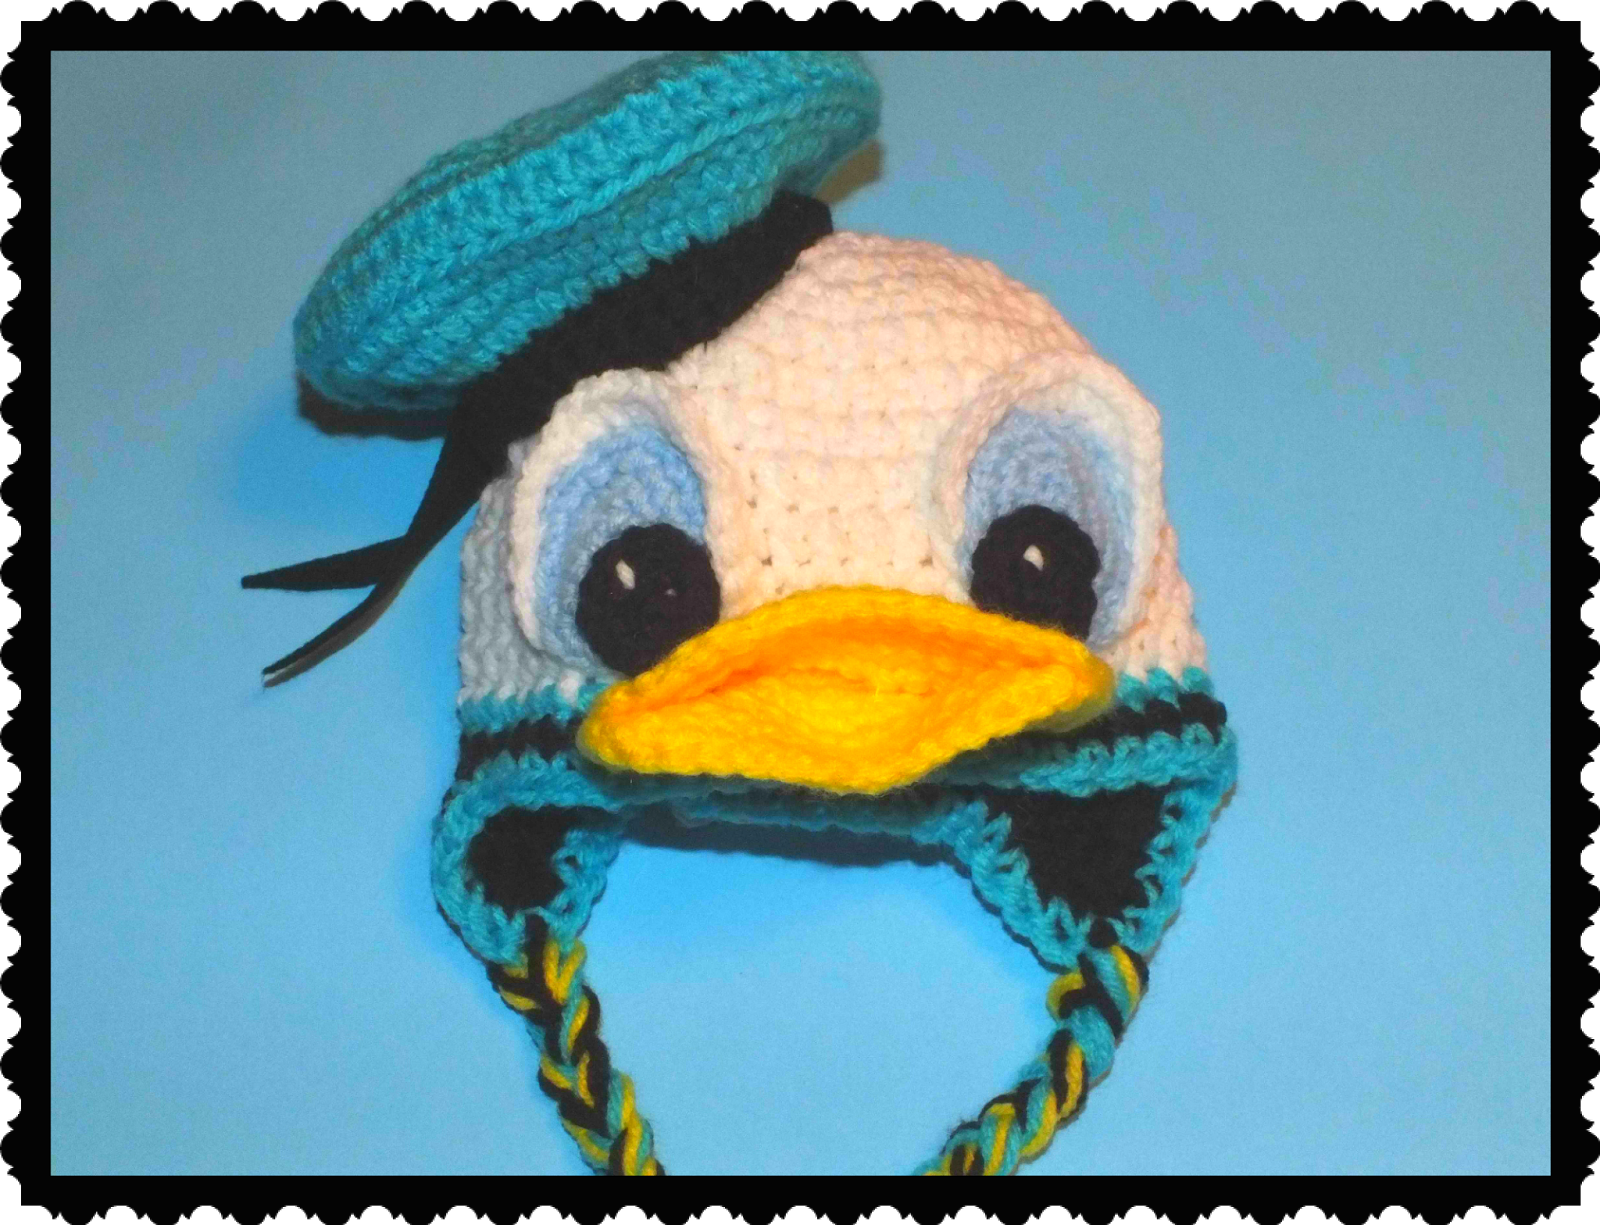
Free Donald & Daisy Duck
Inspired Hats Pattern©
By Connie Hughes Designs©
By Connie Hughes Designs©
.png)
Size 3 to 6 Months/Toddler
Yarn Colors:
White
Black
Turquoise
Bright Yellow
Light Blue
Pink
Purple
Hooks Used:
I, D, G
Other Materials Used:
Small piece black felt for tail on Donald's Hat.
Black Buttons for eyes or you can crochet them.
Sewing Needle & Matching Threads
Sm. Amount of Poly-Fill
Tapestry Needle

These
are super cute and easy to make!
The
patterns are 3 to 6 months/Toddler size...
Perfect
props for those adorable baby photo's!
Row 1. wk 9hdc in the last st.
Row 2. 2hdc in each st-18sts.
Row 3. 1hdc, 2hdc in the next st-27sts.
Row 4. 1hdc in 2, 2sts in the next st-36sts.
Row 5. 1sc in 3, 2sc in the next st-45sts.
Repeat row 5 until the hat measures 5", change color and wk 1sc in each st around.
For Toddler Size
Row 6. 1sc in 4, 2sc in the
next st-54sts, continuing working 1sc in 54sts until hat measures 7”Change to black/Pink and wk 1sc in each st around, make the ear flaps.
To make the Ear
Flaps: Black/Purple & I hook
Row 1. Wk 1sc in 10sts, ch1
& turn.Row 2. dec 1sc, 1sc in 6, dec 1sc, ch1 & turn.
Row 3. 1sc in 8sts, ch1 & turn.
Row 4. dec 1sc, 1sc in 4, dec 1sc, ch1 & turn.
Row 5. 1sc in 6sts, ch1 & turn.
Row 6. dec 1sc, 1sc in 2, dec 1sc, ch1 & turn.
Row 7. 1sc in 4, ch1 & turn.
Row 8. dec 1sc, dec 1sc, ch1 & turn.
Row 9. dec 1sc and FO.
Leaving about 16 to 17 sts in the front of the hat, attach yarn to other side and repeat rows 1-9 of the ear. Once both ear flaps are done attach blue/pink and wk 1sc around the entire hat including ears and FO.
(If making the hat in toddler size-you can make the ear flaps bigger by using 12sts instead of 10).
To make the Eyes (you can use buttons): with Light Blue & D Hook
Ch4
Row 1. 1sc in 2, 3sc in the last st, working on the other side, 1sc in 1, 2sc st.
Row 2. 2sc, 1sc in 3sts, 2sc, 1sc in next 3sts.
Row 3. 2sc in 2sts, 1sc in 3, 2sc in 2, 1sc in 2, 2sc in next st.
Row 4. 1sc in 2, 2sc, 1sc in 3sts, 2sc in next 3sts, 1sc in 6, 1sl st in the last and FO.
For Donald's Eyes: attach white to the BLO, wk 1sc in 7, 1hdc in 6, 1sc in 7, leaving a few unworked sts. Place a black button near where the unworked sts are like in the photo below.

Daisy's Eye Lashes: with Black & G Hook

Attach
yarn wk 1sc in 4, 1hdc in 4 and FO.
Reverse
for other eye. Use a tapestry needle to make the lashes.
To make the Beak: with Bright Yellow & G Hook
Ch11
Row 1. 1sc in 10sts, ch1 & turn.
Row 2. 2sc, 1sc in 8, 2sc, ch1 & turn.
Row 3. 1sc in 12, ch1 & turn.
Row 4. 2sc, 1sc in 10, 2sc, ch1& turn.
Row 5. 1sc in 14, ch1 & turn.
Rows 6-7. repeat row 5
Row 8. 1sc in the FLO, ch1 & turn.
Row 9. 1sc in 14sts, ch1 & turn.
Rows 10-11. repeat row 9
Row 12. dec 1sc, 1sc in 10, dec 1sc, ch1 & turn.
Row 13. 1sc in 12, ch1 & turn.
Row 14. dec 1sc, 1sc in 8, dec 1sc, ch1 & turn.
Row 15. 1sc in 10sts, ch1 & turn.
Row 16. wk 1sc around entire beak and FO.
Sew the beak under the eyes like in the photo.
I sewed the beak on both sides, leaving the front opened like you see in the photo.

To make the hat that goes
on top of the Donald's Hat: with Black & G Hook.
Row 1. 1sc in 30sts, join & ch1.
Rows 2-3. repeat row 1
Change to Turquoise
Row 4. Now working in the FLO 1sc, 2sc in the next st, join & ch1.
Row 5. 1sc in each st-42sts.
Row 6. 1sc in the FLO, join & ch1.
Row 7. 1sc in each st, join & ch1.
Row 8. 1sc in 4sts, dec 1sc, join & ch1.
Row 9. 1sc in 3sts, dec 1sc, join & ch1.
Row 10. 1sc in 2, dec 1sc, join & ch1.
Row 11. 1sc in 1, dec 1sc, join & ch1.
Row 12. dec 1 until closed and FO.
Stuff the hat lightly and sew it onto the main hat.
Attach yarn to the ends and make the braids, don't make them to long if making for a baby.
To make the Bow on
Daisy's Hat: with Pink & G Hook
Ch13
Row 1. 1sc in 12sts, ch1
& turn.Row 2. dec 1sc, 1sc in 8, dec 1sc, ch1 & turn.
Row 3. 1sc in 10sts, ch1 & turn.
Row 4. dec 1sc, 1sc in 6, dec 1sc, ch1 & turn.
Row 5. 1sc in 8, ch1 & turn.
Row 6. dec 1sc, 1sc in 4, dec 1sc, ch1 & turn.
Row 7. 1sc in 6, ch1 & turn.
Row 8. dec 1sc, 1sc in 2, dec 1sc, ch1 & turn.
Row 9. 1sc in 4sts, ch1 & turn.
Row 10. 2sc, 1sc in 2, 2sc, ch1 & turn.
Row 11. 1sc in 6, ch1 & turn.
Row 12. 2sc, 1sc in 4, 2sc, ch1 & turn.
Row 13. 1sc in 8sts, ch1 & turn.
Row 14. 2sc, 1sc in 6, 2sc, ch1 & turn.
Row 15. 1sc in 10sts, ch1 & turn.
Row 16. 2sc, 1sc in 8, 2sc, ch1 & turn.
Row 17. 1sc in 12sts and FO.
To make the Center: with
Pink & G Hook
Ch7
Row 1. 1sc in 6sts, ch1& turn.Row 2. 1sc in 6sts and FO.
Sew it in the center of the bow.
Attach
the center piece with a tapestry needle

Pull ends from left to right and tie off

Sew the bow to the top of
the hat

You are now done with your
Free Donald & Daisy Inspired Hats Pattern©.
I hope who ever you're making them for loves
them as much as I loved making them!
Free Donald & Daisy Inspired Hats Pattern©.
I hope who ever you're making them for loves
them as much as I loved making them!
This free pattern is for personal use.
Characters, Photos, Patterns & Designs
All Rights Reserved.
Connie's Spot© Connie Hughes Designs©
Thanks for Supporting Connie's Spot©
Characters, Photos, Patterns & Designs
All Rights Reserved.
Connie's Spot© Connie Hughes Designs©
Thanks for Supporting Connie's Spot©
by purchasing our paid patterns!