Welcome to Connie's Spot

The Above Picture is some of Connie's Spot© Crochet Patterns© All Patterns are Available at my Shop on ETSY Welcome to the Multiple Award-Winning Connie's Spot© & Connie Hughes Designs© Crocheting Blog! Check out Connie's New Endeavor Paper Crafting-Journals!! Now in our 11th Year We Want to Thank All Our Customers/Friends Who Have Helped Us Grow with Thousands of Pattern Sales/Downloads, and Over "ONE MILLION PAGE VIEWS" from All Over the World!!!

If you are new to Connie's Spot© make sure to take the time to follow Connie's Spot© Her Patterns are available at her shop on Etsy. Check out Connie's Spot© Blog Archive of 300+Posts!! That includes Free Crochet Patterns from Connie Hughes Designs© Free Recipes, New Paper Crafting-Journals, Decorating Tips, & Poetry!

As always Connie's Spot© is free of Pop-Ups and Invasive Ads...so take your time and explore her blog post archives its loaded with gems...most of all enjoy! Connie's Spot© will receive a small commission if you make a purchase after clicking on the Advertiser/Sponsor Links. This helps cover the cost for providing free patterns! Thanks for Visiting Connie's Spot© Blog!!

Connie's Spot© Crocheting & Connie Hughes Designs© Characters, Photo's, Designs & Patterns are All Copyright© Protected All Rights Reserved.

Shop Connies Spot© and Connie Hughes Designs© Crochet Patterns & Handmade Journals on Etsy!!

Shop Connies Spot© and Connie Hughes Designs© Crochet Patterns & Handmade Journals on Etsy!!
Shop Connie's Spot© and Connie Hughes Designs© Crochet Patterns & Handcrafted Journals on Etsy!! 995 Sales of Finished Products & Patterns Plus Over 100 5-Star Reviews!! To All Our Customers Thank You!!! Just Click on the Picture above to take you to my shop on Etsy!

Now Over ONE MILLION PAGE VIEWS!! To All Our Friends, Followers Customers & Visitors Welcome!!

Connie's Spot© Language Translator

"Ladies & Gentlemen Journal" Handcrafted by Connie Hughes Now available on my Etsy Shop!

"Ladies & Gentlemen Journal" Handcrafted by Connie Hughes Now available on my Etsy Shop!
"Ladies & Gentlemen Journal" Handcrafted by Connie Hughes, I have to say this is one of my favorites for sure. I really love this one, because it's a great size. Big enough to write on and small enough to carry inside a bag and take it with you. Now available on my Etsy Shop!

Connie's Spot© Awarded the Feed Spot Top 100 Crochet Blog Award!!

Connie's Spot© Awarded the Feed Spot Top 100 Crochet Blog Award!!
Connie's Spot© Awarded the Feed Spot Top 100 Crochet Blog Award!! I would like to personally congratulate you as your blog Connie's Spot© has been selected by our panelist as one of the Top 100 Crochet Blogs on the Web!!

Connie's Spot© Awarded Top 80 Crochet Blog Award!!

Connie's Spot© Awarded Top 80 Crochet Blog Award!!
"Top 80 Crochet Blogs" By AmsterdamDiary.com: Originality★★★★ Design★★★★★ Social Media★★★★★

Connie's Spot©

Connie's Spot©
Recipient of the One Lovely Blog Award...Thank You Crochet is the Way!!

Monday, May 16, 2016

Free Crochet Sun Hat Napkin Rings & Tea Cups Pattern©

Free Crochet Sun Hat Napkin Rings & Tea Cups Pattern©
By Connie Hughes Designs©
For all my new followers and viewers if you missed it...
This is one of my 1st Free Patterns from 3 years ago!
Connie
I was emptying my dish washer a while back and as I was putting my plates away...
When I thought of making some place mats & napkin rings to match!


I made these little tea cups...


But my favorite are these little hats!
The place mats are one row of single crochet and one row of double crochet, 
then I did a bobble stitch trim.
These little cups & hats are so easy to make...and they really fit with the plates
It's been hard to find napkin rings 
that look right with this set...
Now I can hardly wait to use them!

Free Crochet Sun Hat Napkin Rings & Tea Cups Pattern©
The little hats would be perfect for a ladies tea or the Red Hat Society, 
I made a sample in red.
Materials I used:
Red Heart Yarn
I used these colors because they fit my décor.
Bright Yellow
Spring Green
Blue
Orange
Buff or Tan

Hooks Used:
D,G & H

Other Materials:
Needle & Matching Threads
Fiberfil

Abbreviations
sc-single crochet
dc-double crochet
BLO-back loops only
st-stitch
wk-work
sl-st-slip stitch

For the Tea Cup use G hook
Make the magic ring

Row 1, 6 sc into the ring

Row 2, 2 sc in each st around

Row 3, 1 sc in the next st , 2 sc in the next, around

Row 4, 1 sc in th the BLO

Row 5, 1 sc in each st around, both loops

Rows 6, 7,8, & 9, 1 sc in each st around, at end of row 9 ch 8 and

sl st into the 6th row from the top of the cup, that makes the handle.

Fasten Off.

For the Saucer
Repeat Rows

1, 2, 3 of Tea Cup

Row 4, 1 sc in the next 2 sts, 2 sc in next st, around

Row 5, 1 sc in the next 3 sts, 2 sc in the next st, around and FO

For Top of Tea Cup in buff or tan

Make the magic ring

Row 1, wk 6 sc into the center

Row 2, 2 sc in each st around

Row 3, 1 sc in next st, 2 sc in the next, around and FO

For the Leaf in Spring Green

For cup

Ch 6, 1 sl st, 1 sc, 1 hdc, 1 dc, 6 dc in the last st, working on the other side wk 1 dc, 1 hdc, 1 sc, 1 sl st, FO

For The Napkin Ring Make With Spring Green use H hook

Ch 24 and join with a sl st

Row 1, Ch 1, 1 sc in each st around, join

Row 2, Ch 2, 1 dc in each st around, join

Row 3, Repeat row 1

Row 4, Repeat row 2

Row 5, Repeat row 1

With needle and thread sew the leaves on to the saucer, fill the cup with fiber fill and sew the tan piece down on top. Then sew cup onto leaves and saucer. Sew the cup and saucer onto the napkin ring.

The Hat, use G hook

Make the magic ring

Row 1, 6 sc in the ring

Row 2, 2 sc in each st

Row 3, 1 sc in the next st, 2 sc in the next around

Row 4, 1 sc in each st around

Rows 5, 6 repeat row 4

Row 7, 2 sc in the back loops only all the way around, join

Row 8, ch1, 1sc in each st

Rows 9, 10, 11 repeat row 8 and FO

Bottom of Hat

Make the magic ring

Row 1, 6 sc in the ring

Row 2, 2 sc in each st, around

Row 3, 1 sc in the st, 2 sc in the next st, around

Row 4, 1 sc in the 2 sts, 2 sc in the next st, around

Row 5, 1 sc in the next 3 sts, 2 sc in the next st, around

Row 6, 1 sc in the 4 sts, 2 sc in the next st, around

Row 7, 1 sc in the 5 sts, 2 sc in the next st, around, FO

With a D hook sl st top of hat to the bottom part, stop and stuff the top part of hat and continue your way around. Sometimes the top part of the hat doesn’t lay flat with the bottom, if that happens just tack it down with a needle and thread like in the photo.

Using the D hook and orange yarn

Make the band around the hat ch 45, with matching thread sew to hat like in the picture. Ch 20 to make the loops of the bow, stitch that in place like in the picture.
Make napkin rings and attach like you did for the Tea Cups.


Now you have completed the 
Free Crochet Sun Hat Napkin Rings & Tea Cups Pattern©
This pattern is for personal use.
Characters, Photos, Patterns & Designs Copyright Protected
All Rights Reserved.
Connie's Spot© Connie Hughes Designs©

Thanks for Supporting Connie's Spot©
Craftsy

Sunday, May 8, 2016

Here's Gracie the little Chihuahua

Happy Mother's Day to all the moms out there!
This is my Mother's Day present from my husband...he knew I
needed something little to love...her name is Gracie, she is a pure breed Chihuahua...she weighs about 3.5lb
 and she is the sweetest thing ever...I got her yesterday and
we were out most of the day, she loved being inside my
doggy bag...and every where we went people just loved her...she
slept all night and when she woke up this morning she just
played with her little toy!
I will soon be making little sweaters and hats for her and I'll make those
patterns available to you!
Find great products for your pets + Free Shipping orders $50+ at PetSafe®! Exclusions apply. Limited time offer. Shop now!

Sunday, April 3, 2016

Spike & Pinky© Monster Rock Band Doll Pattern©

Spike & Pinky© Monster Rock Band Doll Pattern©
Plus Spike Pinky© Matching Hats Pattern©
By Connie Hughes Designs©
Here's Spike & Pinky Monster Dolls©
If you ever wondered what a band of monsters would look like...
Well you don't have to wonder anymore...
Here's Rocker Spike on his Bass Guitar and Pinky on the Drums!

 These cute and quirky dolls are my latest creations...
I've been working on them for quite awhile now...
This new pattern covers everything pictured above.
The Dolls, Guitar, Full Drum Set and the Matching Rocker Monster Hats!
All of this for Only $2.99
Just Click on the Buy Now Button Below:

 Pattern is loaded with Pictures and detailed instructions.
Dolls are 26 inches Tall 
Arms and Legs are very long and bendable.  
 The hat pattern comes in 0 to 3 months up to child size!

The Hat and Dolls are very easy to make! 
Perfect for kids and Rockers of all ages!!


Fun to Play with or display while you-they are playing!!
e

Thanks for Supporting Connie's Spot©

Wednesday, March 30, 2016

Free Infinity Scarf Crochet Pattern with Fringe©

Free Infinity Scarf Crochet Pattern with Fringe©
By Connie Hughes Designs©
This scarf is super easy and perfect for a beginner!
"Glamour"
This scarf is made with Lion Brand Yarn Vanna's Glamour in
Moonstone...you'll need about 3 skeins...they are very small rolls...for all
3 scarves I used a 8.00mm Hook.
I have One Only Available of the Finished Scarf for $24.99 at the link below:


This scarf is perfect for Spring...it's a light weight yarn from 
Lion Brand Pound of Love in Bubble Gum
"Bubble Gum"
I have One Only Available of the Finished Scarf for $19.99 at the link below:
https://www.etsy.com/listing/274444922/bubble-gum-infinity-crochet-scarf-with?ref=shop_home_active_1


"Soft Taupe"
I have One Only Available of the Finished Scarf for $19.99 at the link below:
 You'll need 2 skeins of Loops & Threads Impeccable
in Soft Taupe 268 yds...you'll have a little left over!
Loosely ch145 join, being careful not to twist your chain, & ch3.
Row 1. Wk 1dc in each st around, join & ch3.
Rows 2-8. Repeat row 1 and FO.
To make the Tassels:
Cut yarn pieces about 9 or 10 inches in length.
Put 3 or 4 pieces together like in the photos below.


This Completes the Free Infinity Scarf Crochet Pattern with Fringe©
Connie’s Spot© & Connie Hughes Designs© 
Connie Hughes Owner/Designer 
The Free Infinity Scarf Crochet Pattern with Fringe©is for personal use. 
Characters, Photos, Patterns & Designs 
Are Copyright Protected All Rights Reserved.
Happy Crocheting!! 
Connie

Sunday, March 13, 2016

Free 4 in 1 Celebrity Handbag Crochet Pattern©

Free 4 in 1 Celebrity Handbag Crochet Pattern©
By Connie Hughes Designs©
1 Bag 4 Looks
To fit any girls mood!
 This bag comes with 4 snap on faces and 4 different snap on handles...
to fit any girl and any of her moods!
Who wants just 1 bag when you can have 4!
Seriously can a girl ever have to many purses?


Red Heart Super Saver Yarns used in Pattern:
1 Skein of Bright Yellow (you will have left over yarn)
Small Amounts of yarns:
Glowworm Green
Turquoise
Pretty in Pink
Light Grey
Purple
Buff
White
Black
Red
Hooks used in Pattern:
4.5
F (3.75mm)
Other Materials used in Pattern:
Snaps Size 4 (to make all of the characters & the bag you will need 14 Female snaps & 5 male snaps)
Sewing Needle & Thread
2 Tiny Black Buttons (for Angry Bird Eyes)
2 Small Black Buttons 7/16"
Black Embroidery Floss
2 Small Felt Circles in Pink
Light Green Felt
Dark Green Felt
Yellow Felt
Orange Felt
White Felt
Brown Felt
Tan Felt
Yellow Ribbon
The finished purse is about 6" long & 4 ½" tall.
To make the bottom of the Purse: with Bright Yellow Yarn & 4.5 Hook
Making an oval can be tricky sometimes so if you need help there is a Crochet Oval Video Tutorial at the bottom:
Ch13
Row 1. 1sc in 11sts, 3sc in the last st, 1sc in 10sts, 2sc in the last.
Put stitch marker in the last stitch.
Row 2. 2sc, 1sc in 10sts, 2sc in the next 3sts, 1sc in next 11sts, 2sc in the next 1st.
Row 3. 2sc in 2, 1sc in the 12sts, 2sc in the next 3sts, 1sc in the next 13sts, 2 c in next 1st.
Row 4. 2sc in 2sts, 1sc in 15sts, 2sc in the next 3sts, 1sc in 16sts, 2sc in 1.
Row 5. 2sc in 2, 1sc in 18, 2sc in 1, 1sc in 2, 2sc in 1, 1sc in 18sts, 2sc.
Row 6. 1sc in 2sts, 2sc in 2, 1sc in 19, 2sc in 1, 1sc in 2, 2sc in 2, 1sc in 19sts
2sc in the last st-54sts.
Continue on to row 7 below.
Photo 1

Photo 2


Photo 1 is the bottom of the bag, you want the oval to lay flat. But don’t worry
if it curls a little. Now to make the sides of the bag.

Row 7. 1sc in each st around.
Rows 8-22. 1sc in each st around, in the last row wk sts until your near the edge and FO.

To make the Flap opening/closure: with Bright Yellow Yarn & 4.5 Hook
You want to make sure that you have the same number of stitches on each side of the bag like in photo 3 (I had 6sts on each side).


Attach yarn to the back and on the right side with a slst & ch1.
Row 1. 1sc in 13sts, ch1 & turn.
Rows 2-14. repeat row 1
Row 15. dec1sc, 1sc in 9, dec1sc, ch1 & turn.
Row 16. dec1sc, 1sc in 7, dec1sc, ch1 & turn.
Row 17. dec1sc, 1sc in 5, dec1sc, ch1 & turn.
Row 18. dec1sc, 1sc in 3, dec1sc, ch1 do not turn.
With an F Hook 
Row 19. 1sc in each st around entire bag and FO.
                       Photo 3                

Photo 4

Once your bag is done put your snaps in place.
Place 1 male snap on the front flap like in the photo below.
    Photo 5
Place a male snap on the inside flap like in the photo below.
   Photo 6

Place a female snap on the front of the bag like in the photo below.
Photo 7


Place 1 male snap on each side of the bag like in the photo below.
    Photo 8

To make the Character Faces: with Buff/Red/White Yarn & F Hook (make 2 for each face).
Photo 9


Ch2
Row 1. 6sc in the 2nd st from the hook.
Row 2. 2sc in each st around-12sts.
Row 3. 1sc, 2sc in the next st-18sts.
Row 4. 1sc in 2, 2sc in the next st-24sts.
Row 5. 1sc in 3, 2sc in the next st-30sts.
Row 6. 1sc in 4, 2sc in the next st and FO-36sts

Photo 10 (make 2)

To make the Hair: with Turquoise Yarn & F Hook
Ch13
Row 1. 1sc in 12sts, ch1 & turn.
Row 2. dec1sc, 1sc in 8, dec1sc, ch1 & turn.
Row 3. dec1sc, 1sc in 6, dec1sc, ch1 & turn.
Row 4. dec1sc, 1sc in 4, dec1sc and FO
Attach small black buttons just below where the hair will be and sew in place.
With black embroidery floss make eyelashes and smile. 
Hot glue or sew 2 small pink circles on for cheeks.
Photo 11
Photo 12

On the other round circle attach snap and sew into place (like in photo 12 above). Then wk 1sc around both faces in Buff (making sure that the sides with the buttons and snap are facing out and that the snap is in the up position like in the photo above.
Photo 13

To make the Turquoise Curls: with Turquoise Yarn & D Hook (make 3 on each side).
Ch13
1sc in 12sts, when you reach the top ch13 again and repeat, end with a slst and FO.
To make the Turquoise Handle/ Yellow Minion Arms: Turquoise/Bright Yellow Yarn & D Hook

Photo 14

Ch2
Row 1. 4sc in the 2nd st from the hook.
Row 2. 2sc in each st-8sts.
Row 3. 1sc in each st around-8sts.
Repeat until handle measures about 12" and FO.
Sew 1 female snap on each end of the turquoise handle.

To make the Minion Hands: with Black Yarn & D Hook (make 2)
Ch2 
Row 1. wk 6sc in the 2nd st from the hook.
Row 2. 2sc in each st-12sts.
Row 3. 1sc in 12sts.
Rows 4-5. repeat row 3, ch2.
Row 6. wk 2hdc in the BLO and FO.

To make the Fingers:
Row 1. Ch5, wk 1slst in 4 
Row 2. Ch6, wk 1slst in 5
Row 3. repeat row 2 and FO.
Sew on to the hand.
Snap placement on the Minion Arm Handles:
On 1 arm you will put 1 male snap and on the other side place 1 female snap.
Photo 15
On the other arm you will put 1 female snap on the top part of arm and 1 female snap on the hand.
Photo 16
To make the Ringlets: with Turquoise/Bright Yellow & D Hook
Ch16, wk 3sc in each st across and FO. (make 2)
Ch24, repeat and make 2 and FO. (make 2)
To make the Bows: with (Turquoise & F Hook) (Pretty in Pink & D Hook)
Photo 17
Ch7
Row 1. 1sc in 6sts, ch1 & turn.
Row 2. dec1sc, 1sc in 2, dec1sc, ch1 & turn.
Row 3. 1sc in 4sts, ch1 & turn.
Row 4. dec1sc, dec1sc, ch1 & turn.
Row 5. 2sc in each st, ch1 & turn.
Row 6. 1sc in 4sts, ch1 & turn.
Row 7. 2sc, 1sc in 2, 2sc, ch1 & turn.
Row 8. 1sc in 6sts, ch1 & turn.
Row 9. repeat row 8 and FO.
To make the center of the bow: 
Ch7, wk 1sc in 6sts and FO, sew around the center of the bow.
To make the Goggles for the Minion Eye: with Light Grey Yarn 
Photo 18
Row 1. In the FLO wk 1sc in 5, 2sc in the next st.
Rows 2-3. 1sc in 42sts.
Row 4. 1sc in the BLO in each st.
Row 5. 1sc in each st
Rows 6-7. repeat tow 5 and FO. 

To make the 2 small pieces on each side of the Goggles: with Light Grey Yarn & D Hook
Ch6
Row 1. wk 1sc in 5sts, ch1 & turn.
Rows 2-3. repeat and FO. 
Sew one on each side.
With brown felt cut out round eye, cut a small round circle in black for the pupil. Glue in place with hot glue or fabric glue.

Cut out an eyelid in yellow and sew in place.

To make the Angry Bird's Eye Brows: with Black Yarn & D Hook
Photo 19
Ch14
Row 1. wk 1hdc in the 3rd st from the hook, 1hdc in 2, 1sc in 2, 1slst in 2, 1sc in 2, 1hdc in 3 and FO.

Cut out eyes with white and black felt, sew the tiny black buttons onto the white pieces of felt. Glue the black felt to the face and then glue the white piece of felt on top of the black. Cut out a beak and glue just under the eyes. With tan felt cut out the piece that goes under the beak and glue that in place. Sew the eyebrows above the eyes. 

To make the 2 top pieces on the head: with Red Yarn & D Hook
Ch7, 1sc in 6sts, wk 1slst down inside the face and ch6, 1sc in 5sts, wk 1slst down inside the face and FO. 

To make the Strap: with Glowworm Green Yarn & F Hook
Ch6
Row 1. 1sc in 5sts, ch1 & turn.
Repeat until the strap is the desired length. I made mine about 18" long and FO. 
Sew 1 females snap on each end of strap.
Photo 20
To make the Little Green Pig that is attached to the strap: with Glowworm Green Yarn & D Hook
Photo 21
Repeat rows 1-4 of the character faces above. 
Row 5. ch2 wk 2hdc in the same st, ch2, wk 1slst in the same st as the 2hdc, 1sc in the next 2sts, wk 1slst in the next st, ch2, wk 2hdc in the same st as the slst, ch2, 1slst in the same st and FO. 

Cut out a small crown and glue in place. Cut out nose with light green felt and 2 holes for the nose in dark green. 2 small pieces in dark green for the ears, 2 small white pieces for the eyes. I used a permanent marker in black for the pupils.

To make the Small Flower: with Bright Yellow Yarn & D Hook
Ch2
Row 1. 6sc in the 2nd st from the hook.
Row 2. 2sc in each st and FO.
Attach Purple with a slst and ch4.
Row 3. 1sc, 1hdc, 1dc, sk 1st, 1sc in the next st, 1slst in the next st, ch4 and repeat all the way around and FO.
To make the Hello Kitty Ears: with White Yarn & D hook (make 2) 
Photo 22
(the bow pattern is above)
Join with a slst and ch1
Row 1. wk 1sc in 5sts, ch1 & turn.
Row 2. repeat row 1
Row 3. dec1sc, 1sc in 3, ch1 & turn.
Row 4. dec1sc, dec1sc and FO. 

Cut out 2 small pieces of black felt for eyes and glue in place. Cut out a small piece of yellow felt for the nose and glue that in place. With black yarn make 3 whiskers on each side of face. 

To make the Strap: with White, Pretty in Pink, Bright Yellow & D Hook
Ch71, wk 1slst in the 2nd st from the hook, ch70 and FO. Make 2 in each color. 
To make the end pieces: with White/Pretty in Pink Yarn & F Hook (make 2)
Photo 23
Photo 24
Ch6
Row 1. 1sc in 5, ch1 & turn.
Rows 2-5. repeat row 1
Row 6. 1sc in the BLO in each st, ch1 & turn.
Rows 7-10. repeat row 1 and FO. 

Sew the ends of each of the ch71 to the pink or white end piece. Braid the 6 strands together and sew the braided strands to the other end piece. Sew 1 female snap on each end piece. You are now done with your celebrity handbag.

Crochet Oval Video Tutorial 

This Completes the Free 4 in 1 Celebrity Handbag Crochet Pattern©
Connie’s Spot© & Connie Hughes Designs© 
Connie Hughes Owner/Designer 
The Free 4 in 1 Celebrity Handbag Crochet Pattern© is for personal use. 
Characters, Photos, Patterns & Designs 
Are Copyright Protected All Rights Reserved.
Happy Crocheting!! 
Connie

Here are a Few of Connie's Spot© Easter & Bunny Patterns Available! 
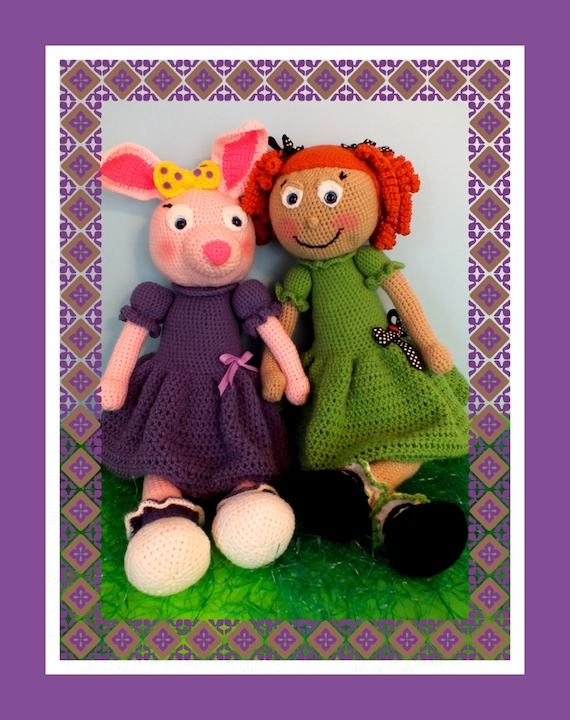
Zoe Girl© and Jelly Bean Bunny© Crochet Doll Pattern©
Zoe Girl and Jelly Bean Bunny Rabbit Crochet Dolls Pattern©
Available now for only $2.99 just click the buy now button below:


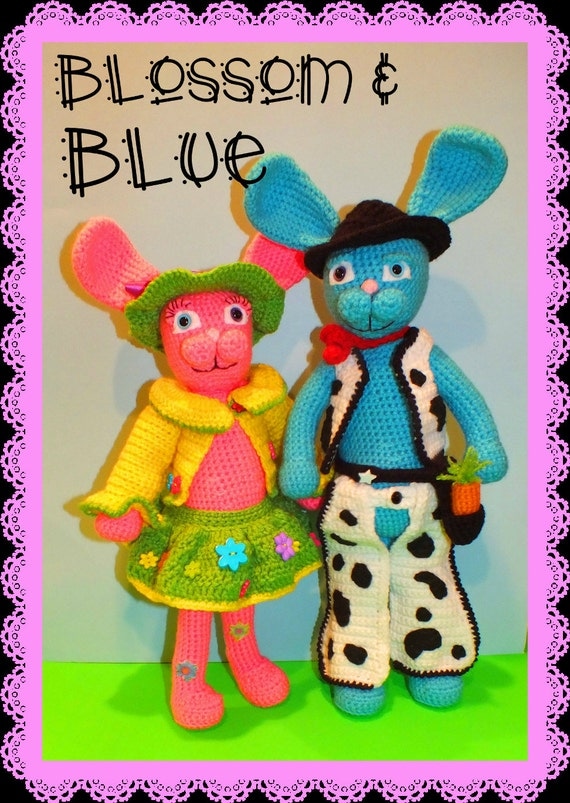
Blossom & Blue Bunny Dolls Pattern© 


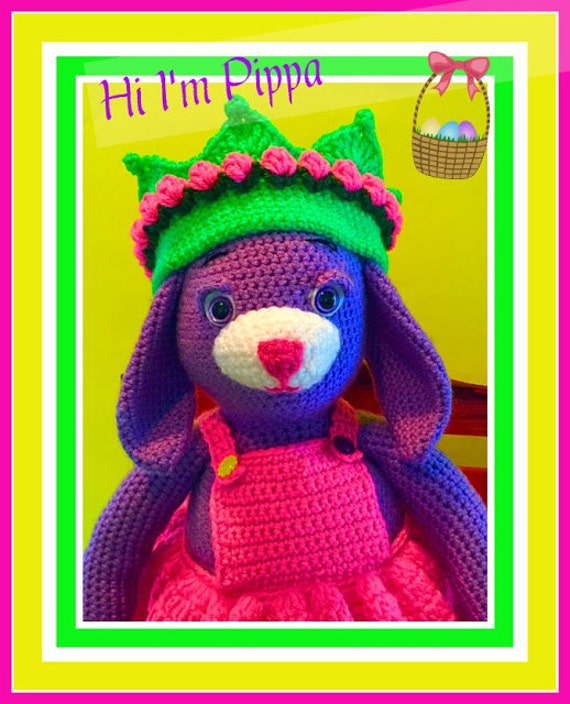
Pippa the Purple Bunny Doll Pattern©Pippa the Purple Bunny Doll Pattern©
Available now for only $2.99 just click the buy now button below:

Thanks For Supporting Connie's Spot©!!

Make Sure You Check This Out!! Connie's Spot© Blog Post Archive 300+ Posts Loaded With Gems!!!