Welcome to Connie's Spot

The Above Picture is some of Connie's Spot© Crochet Patterns© All Patterns are Available at my Shop on ETSY Welcome to the Multiple Award-Winning Connie's Spot© & Connie Hughes Designs© Crocheting Blog! Check out Connie's New Endeavor Paper Crafting-Journals!! Now in our 12th Year We Want to Thank All Our Customers/Friends Who Have Helped Us Grow with Thousands of Pattern Sales/Downloads, and Over "ONE MILLION PAGE VIEWS" from All Over the World!!!

If you are new to Connie's Spot© make sure to take the time to follow Connie's Spot© Her Patterns are available at her shop on Etsy. Check out Connie's Spot© Blog Archive of 300+Posts!! That includes Free Crochet Patterns from Connie Hughes Designs© Free Recipes, New Paper Crafting-Journals, Decorating Tips, & Poetry!

As always Connie's Spot© is free of Pop-Ups and Invasive Ads...so take your time and explore her blog post archives its loaded with gems...most of all enjoy! Connie's Spot© will receive a small commission if you make a purchase after clicking on the Advertiser/Sponsor Links. This helps cover the cost for providing free patterns! Thanks for Visiting Connie's Spot© Blog!!

Connie's Spot© Crocheting & Connie Hughes Designs© Characters, Photo's, Designs & Patterns are All Copyright© Protected All Rights Reserved.

Shop Connies Spot© and Connie Hughes Designs© Crochet Patterns & Handmade Journals on Etsy!!

Shop Connies Spot© and Connie Hughes Designs© Crochet Patterns & Handmade Journals on Etsy!!
Take advantage of the 15% off Christmas Crochet Pattern Sale going on now on my ETSY Shop! Shop Connies Spot© and Connie Hughes Designs© Crochet Patterns & Handmade Journals on Etsy!! https://conniesspot.etsy.comShop Connie's Spot© and Connie Hughes Designs© Crochet Patterns & Handcrafted Journals on Etsy!! Now Over 1000 Sales of Finished Products & Patterns, Plus Over 100 5-Star Reviews!! To All Our Customers Thank You!!! Just Click on the Picture above to take you to my shop on Etsy!

Christmas Snow Globe Journal Handcrafted by Connie Hughes

Christmas Snow Globe Journal Handcrafted by Connie Hughes
This Christmas Snow Globe Journal is just fun to write down Your Holiday Memories, Your Christmas Wishes and More! Now available on my Etsy Shop!

Now Over ONE MILLION PAGE VIEWS!! To All Our Friends, Followers Customers & Visitors Welcome!!

Connie's Spot© Language Translator

Sunday, December 7, 2014

Holiday Decorating Ideas Kitchen around the House!

"Holiday Decorating Ideas for the Kitchen & around the House"
by Connie Hughes Designs©

I just finished decorating around the house today...
I didn't know what to do in my kitchen...
I just knew I wanted lights, presents with pretty ribbons...
I just wanted cute Christmas stuff!
So this little Santa worked perfect and he
has a lot of sparkle!
I've had this Santa Platter for years and I never
had room for it on my counter tops to display it...
but he's found a new home this year!
I found this little Rocking Horse at my Fred Meyers Store this year,
and he too just looks right at home up there!
I needed boxes so I looked high and low...I found some in my
pantry...I used cereal boxes, those zip lock baggies boxes, I used
 boxes that held some of my Christmas decorations...I just
marked those boxes so I could find them easily
when it's time to pack them up!
I just love my chef Nutcracker!
Speaking of Nutcrackers here's my displays
and more Nutcrackers

If you can find it in your heart or if you need a reason
let me remind you Christmas is Nutcracker season!
Here's the link to my Crochet Christmas Nutcracker Pattern.
 

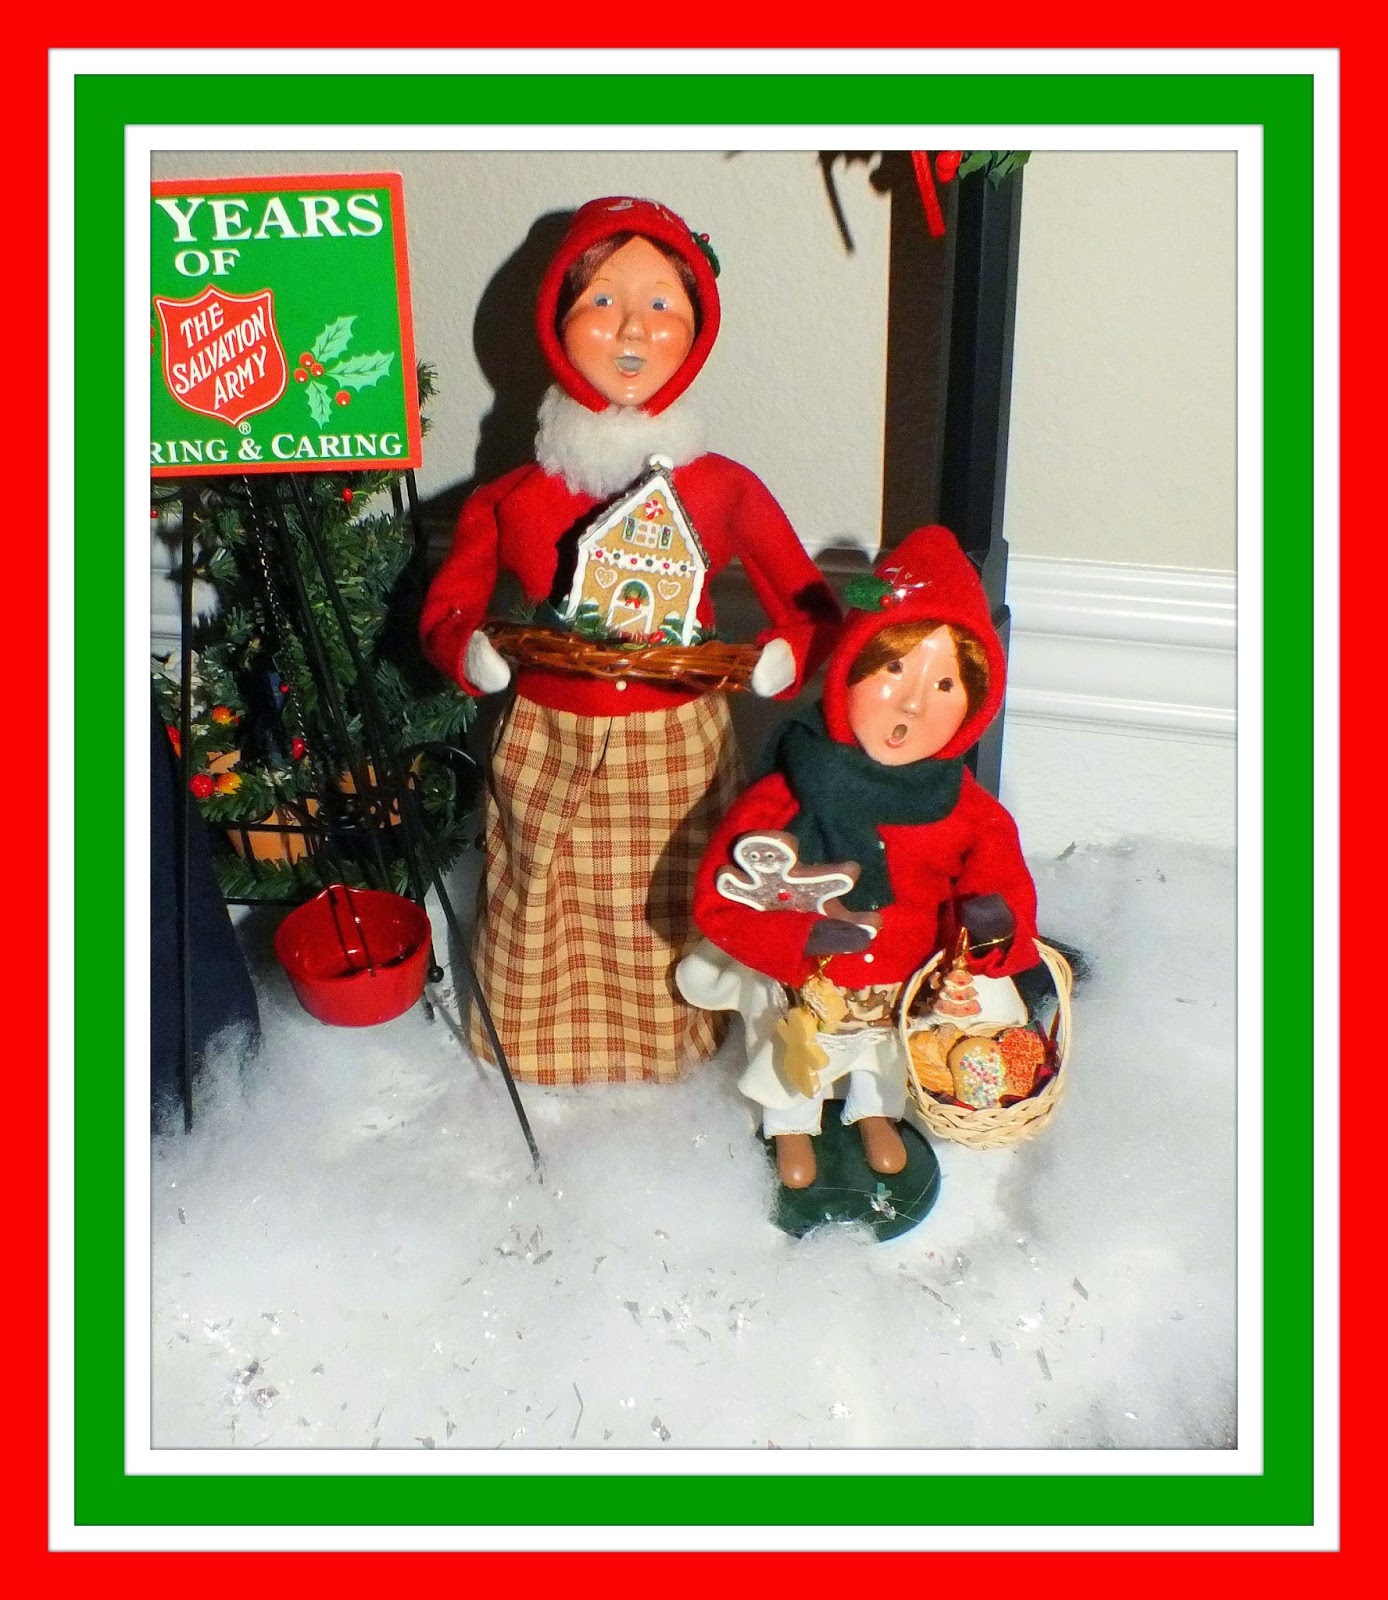
I just started collecting Byers Choice Dolls a few years ago...when I was in
Oregon this summer, we found this Christmas Shop in Lincoln City
and they had Byers Choice Dolls...so I had to stop and look...
My sweet husband bought me the door and another
Salvation Army doll...I was in heaven!
He surprised me with these Mother & Daughter
Gingerbread Dolls last year...and they are adorable!
I got her when we went to Leavenworth a few
years ago...I just love her!
They are all Made in America!
When I was setting these up today...I was pondering who
would I give these too and who in the world would want them?
Oh well I have many years to ponder!
Don't forget the stairs!

I have two of these hanging on my wall in my living room
and they just looked a little plain...so I tied a little red
ribbon around the candles...and now I love them!
Decorating for the Holidays is so much fun...
and every decoration has some memory attached to it...
it's sad we only get them out once a year...
I hope you all have a wonderful Christmas
and a great and Happy New Year!
Connie

Thanks for Supporting Connie's Spot© Sponsors! 
Pottery Barn

Christmas Holiday Décor @ Pottery Barn

christmas gifts and christmas party supplies  

Friday, December 5, 2014

Free Captain America Inspired Hat & Shield Pattern©

Free Captain America Inspired Hat & Shield Pattern©
By Connie Hughes Designs©
I just finished my new hat pattern and I added
something new to make play time a lot more fun!
"This hat is child size"


Materials Used:
Red Heart Yarns
Red, Royal Blue, White, Light Grey
Plastic Canvas, Needle & Thread

Hooks Used:
I & G

To make the Hat: with Royal Blue Yarn & I Hook
Ch2
Row 1. Wk 9hdc in the ring, do not join-9sts.
Row 2. 2hdc in each st around-18sts.
Row 3. 1hdc in the first st, 2hdc in the next, around-27sts.
Row 4. 1hdc in 2 sts, 2hdc in the next, around-36sts.
Row 5. 1hdc in the next 3 sts, 2hdc in the next, around-45sts.
Row 6. 1hdc in 4 sts, 2hdc in the next, around-54sts.
Row 7. 1hdc in 5 sts, 2hdc, around-63sts.
Row 8. 1hdc in each st-63sts.
Rows 9-16. Repeat row 8
Row 17. 1sc in each st around-63sts.

To make the Eyes:
Row 18. 1sc in 15sts, ch12, sk 10sts, wk 1sc in the next 4sts, ch12,sk 10sts, wk 1sc in the rest of the sts around hat.
Row 19. 1sc in 15sts, 1sc in 2sts of ch12, 2sc, 1sc in 4, 2sc, 1sc in 6sts.
Row 20. 1sc in 2, 2sc, 1sc in 4sts, 2sc, 1sc in the next 2sts, continue working 1sc around the rest of the hat.
Row 21. 1sc in each st around and FO.

This is a super easy way to make the letter A
To make the A: with White Yarn & G Hook


Ch24
Wk 1sc 11sts, 2sc in the next st, 1sc in 11sts & FO.
Ch6, wk 1sc in each st and FO-5sts.
Sew the A onto the hat, sew the middle piece in place.

To make the Wings: with Light Grey & G Hook (make 2)


Ch9
Row 1. 1sc in 8sts, ch1 & turn.
Row 2. Working in the FLO 1sc in 7, 2sc, ch1 & turn.
Row 3. 1sc in 9sts, ch1 & turn.
Row 4. In the FLO wk 1sc in 8sts, 2sc, ch1 & turn.
Row 5. 1sc in 10sts, ch1 & turn.
Row 6. In the FLO 1sc in 9, 2sc, ch1 & turn.
Row 7. 1sc in 11sts, without turning work along the edge dec1 sc 3x, sl st 1, ch1 & turn, dec1 sc 2x, ch1 & turn dec1 sc and FO.
Sew 1 wing on each side of hat.


 The Shield looks hard to make but it's really not...I promise!


To make the Front Shield: with Royal Blue Yarn & G Hook


So now is a good time to watch tv or a movie!

(To make the circle: end each row with a join & ch2)
Ch3
Row 1. Wk 9hdc in the last st from the hook, join & ch2-9sts.
Row 2. 2hdc in each st-18sts-18sts.
Row 3. 1hdc, 2hdc in the next st-27sts.
Row 4. 1hdc in 2, 2hdc around-36sts.
Row 5. 1hdc in 3, 2hdc around-45sts.
Row 6. 1hdc in 4, 2hdc around-54sts.
Row 7. 1hdc in 5, 2hdc around-63sts.
Row 8. 1hdc in 6, 2hdc around-72sts.
Row 9. 1hdc in 7, 2hdc around-81sts.
Change to Red
Row 10. 1hdc in 8, 2hdc around-90sts.
Row 11. 1hdc in 9, 2hdc around-99sts.
Row 12. 1hdc in 10, 2hdc around-108sts.
Change to Light Grey
Row 13. 1hdc in 11, 2hdc around-117sts.
Row 14. 1hdc in 12, 2hdc around-126sts.
Row 15. 1hdc in 13, 2hdc around-135sts.
Change to Red
Row 16. 1hdc in 14, 2hdc around-144sts.
Row 17. 1hdc in 15, 2hdc around-153sts.
Row 18. 1hdc in 16, 2hdc around & FO-162sts.


Repeat rows 1-18 to make the back side of the shield...I just used a solid color.
 
 You can crochet the star or cut one out of felt and sew it on....whatever you prefer.

To make the Star: with White Yarn & G Hook

Ch2
Row 1. wk 6sc in the 2nd st from the hook.
Row 2. 2sc in each st-12sts.
Row 3. 1sc, 2sc in the next st-18sts.
Row 4. 1sc in 2, 2sc in the next st-24sts.
Row 5. 1sc in 3, 2sc in the next st-30sts.
Row 6. 1sc in 4, 2sc in the next st-36sts.
Row 7. 1sc in 5, 2sc in the next st-42sts.
Row 8. 1sc in 6, 2sc in the next st-48sts.
To make the first point:
Rows 9-10. wk 1sc in 8sts, ch1 & turn.
Row 11. dec1sc, 1sc in 4sts, dec1sc, ch1 & turn.
Row 12. 1sc in 6sts, ch1 & turn.
Row 13. dec1sc, 1sc in 2sts, dec1sc, ch1 & turn.
Row 14. 1sc in 4sts, ch1 & turn.
Row 15. dec1sc, dec1sc, ch1 & turn.
Row 16. dec1sc and FO.
Reattach yarn next to the first point with a sl st, ch1, wk 1sc in the same st as the sl st.
Repeat rows 9-16 & FO only 4 points.
On the last point attach yarn like you did for all 4 points but wk 1sc in 3sts then continue on making the last point. Do not FO the last point.

Once all 5 points are done, with the white yarn that's still attached ch1, wk 1sc in each st around the entire star, when you get to each tip of each point ch1 and continue on around.
With a tapestry needle weave in all the loose ends of yarn.


Before putting the plastic canvas between the front & back panels...sew the plastic canvas randomly to the back panel...sew the star onto the front panel...then with red yarn put both panels together and work 1sc through both pieces all the way around and FO.


Now take a little red thread and work the needle through both pieces in several places. Being careful not to pull the thread to tight.
This will help make the shield a little more sturdy.


To make the Handle: with Blue Yarn & G Hook
Ch12 & join Ch1
wk 1sc in each st around, repeat until the tube is about
5 or 6 inches long. Wk 1sc through both sides and close the one end and FO. Stuff and attach blue yarn and seal this side closed.
Sew both ends to the back of the shield.


If you have any questions about this pattern please feel free to contact me at my email:conniehughes212@gmail.com
Connie’s Spot© & Connie Hughes Designs©
Connie Hughes Owner/Designer
This free pattern is for personal use.
Photos, Patterns Are Copyright Protected
All Rights Reserved.
I hope you enjoy making this Pattern &
Who you’re making it for enjoys it even more!
Happy Crocheting!!
Connie
 
Thanks for Supporting Connie's Spot© Sponsors!!


Wednesday, November 26, 2014

Christmas Mouse Nutcracker & Doll Pattern©

"Christmas Mouse Nutcracker & Doll Pattern© "
 By Connie Hughes Designs©
I just finished this Christmas Mouse Nutcracker...
When I started him I wanted him to stand up on a base like
a real nutcracker...so I worked and reworked him
and I finally got him to stand...so he now stands about
19" tall...and he really stands on his own...yay!


Everybody dreams of a Nutcracker at least once a year
We have memories in our hearts, we hold so dear
I'm that perfect fella, see how easy I get along
and if you decide to make me you won't go wrong
I'm brave and proud even when I stand alone
I'm just a little Nut who's looking for a home

If you can find it in your heart or if you need a reason
let me remind you Christmas is Nutcracker season!
 So while your turkey dinner is digesting, get your
crochet hook out while resting!
The Pattern is Available at Connie's Spot© Shop or the link below:

I hope you enjoy this little Nutcracker as much as I did making him!
I wish you a very Merry Christmas and a wonderful New Year!
I thank you all for supporting Connie’s Spot©
 I’m looking forward to many new Designs in 2015!!

Merry Christmas Everyone!
Connie


Thanks for Supporting Connie Spot© Sponsors!! Craftsy Crochet Essentials: Increases & Decreases

Friday, November 21, 2014

Free Ninja Turtle Inspired Crochet Hat Pattern©


Free Teenage Mutant Ninja Turtle Inspired Hat Pattern©
By Connie Hughes Designs©
This Pattern is for Child Size Hats.
Here's a free and super easy hat pattern for the kids!
Pattern is below!

How easy? I made all of them in a day...the pattern is a child size because
it's a little tricky to make the eyes without someone to try it on!
And all I had was foam head!
 Great little stocking stuffer!

POTTERY BARN

POTTERY BARN
Make it a Pottery Barn Christmas


Turtle Power!!
Yarns Used in Pattern:
Paddy Green
Cherry Red
Royal Blue
Orange
Purple
 
I (5.5mm) Hook 
Stitch Marker
       

To make hat Paddy Green & I hook
Ch2
Row 1. Wk 9hdc in the 2nd st from the hook.
Row 2. 2hdc in each st around-18sts.
Row 3. 1hdc, 2hdc in the next st-27sts.
Row 4. 1hdc in 2sts, 2hdc in the next st-36sts.
Row 5. 1hdc in 3, 2hdc in the next st-45sts.
Row 6. 1hdc in 4, 2hdc in the next st-54sts.
Row 7. 1hdc in 5, 2hdc in the next st-63sts.
Row 8. 1hdc in each st around-63sts.
Rows 9-15. repeat row 8 (until the hat measures about 6inches)
Wk 1sc in 2sts in Green and attach Red, Orange, Purple or Blue yarn with a sl st and ch1.
Row 16. wk 1sc in each st around-63sts.
Use a st marker
Row 17. repeat row 16
Row 18. 1sc in 25sts, ch8, sk 7sts, 1sc in 3sts, ch8, sk 7sts, 1sc in each st around.
Row 19. 1sc in each st, including each set of ch8.
Rows 20-21. 1sc in each st around.
Row 22. 1sc in 29sts, 2sc in 2sts, 1sc in 9, 2sc in 2sts, 1sc in each st around & FO.

To make the tie piece on the side of the hat:
Ch38
1sc in the 1st st, 1hdc in 3, 1dc in 12sts, 1sc in 5, 1dc in 12, 1hdc in 3, 1sc in the last st and FO.
Tie it into a small knot and sew piece to one side of the hat.


If you have any questions about this pattern please feel free to
contact me at my email:conniehughes212@gmail.com
Connie’s Spot© & Connie Hughes Designs©
Connie Hughes Owner/Designer
This pattern is for personal use.
Photos, Patterns, & Designs Are Copyright Protected All Rights Reserved.
I hope you enjoy making this Pattern &
Who you’re making it for enjoys it even more!
Happy Crocheting!!
Connie


Thanks for Supporting Connie's Spot© & Our Sponsors!!


Make Sure You Check This Out!! Connie's Spot© Blog Post Archive 300+ Posts Loaded With Gems!!!