"Here's Something for the Kiddies"
Free St. Patrick's Day Top Hat & BROBEE Hat Patterns©
By Connie Hughes Designs©
Free St. Patrick's Day Top Hat & BROBEE Hat Patterns©
By Connie Hughes Designs©
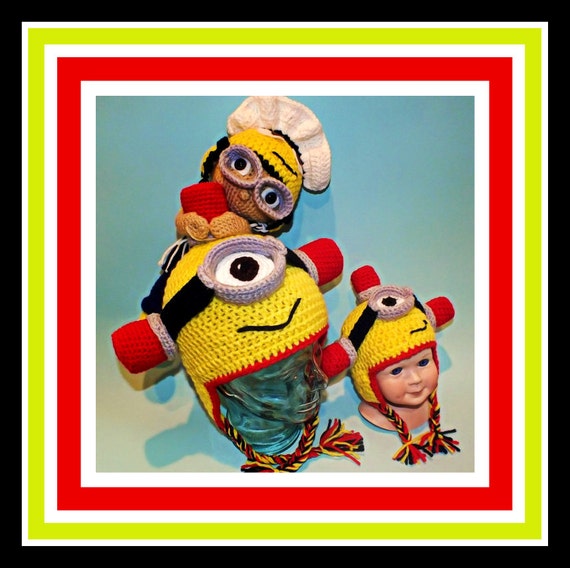
This top hat is perfect for kids and teens...
the BROBEE hat is perfect for toddlers and small children!

the BROBEE hat is perfect for toddlers and small children!

Materials Used
Red Heart Yarns were used to make Top Hat:
1 Skein of Spring Green
Black
Gold
Other Materials used to make Top Hat:
Needle & Black/Gold Thread
Hook Used 4.5
The hat patterns are worked in the round so use a stitch marker.Other Materials used to make Top Hat:
Needle & Black/Gold Thread
Hook Used 4.5
Abbreivations used in both Patterns:
sc-single crochet
hdc-half double crochet
dec-decrease
st-stitch
sts-stitches
ch-chain
sk-skip
wk-work
slst-slip stitch
BLO-back loops only
FLO-front loops only
FO-fasten off
Size Child/Teen
To make the hat: with Spring Green Yarn & 4.5 Hook
Ch2
Row 1. Wk 6sc in the second st from the hook.
Row 2. 2sc in each st around-12sts.
Row 3. 1sc, 2sc in the next st-18sts.
Row 4. 1sc in 2, 2sc in the next st-24sts.
Row 5. 1sc in 3, 2sc in the next st -30sts.
Row 6. 1sc in 4 sts, 2sc in the next st-36sts.
Row 7. 1sc in 5 sts, 2sc in the next st-42sts.
Row 8. 1sc in 6 sts, 2sc in the next st-48sts.
Row 9. 1sc in 7 sts, 2sc in the next st-54sts.
Row 10. 1sc in 8sts, 2sc in the next st-60sts.
Row 11. 1sc in 9sts, 2sc in the next st-66sts.
Row 12. 1sc in 10, 2sc in the next st-72sts.
Row 13. 1sc in 11, 2sc in the next st-78sts.
Row 14. 1sc in 12, 2sc in the next st-84sts.
Row 15. 1sc in 13, 2sc in the next st-90sts.
Row 16. 1sc in the FLO in 90sts.
Row 17. 1sc in each st around-90sts.
Rows 18-40. Repeat row 17
Row 41. 1sc in 13, dec1sc around-84sts.
Row 42. 1sc in 12, dec1sc around-78sts.
Row 43. 1sc in each st around-78sts.
Rows 44-45. Repeat row 43
Row 46. Working in the BLO 1hdc in the in 2, 2hdc in the next-105.
Row 47. 1hdc in each st around-105sts.
Rows 48-49. Repeat row 47
Row 50. 1hdc in 9, 2hdc in the next st, 1hdc in the last 3sts.
Row 51. Working in the FLO 1hdc in 9, 2hdc in the next st around.
Row 52. 1hdc in each st around.
Row 53. 1hdc in 3, dec1hdc around.
Row 54. 1hdc in each st around.
Row 55. 1hdc in 2, dec1hdc around.
Now to attach the brim to the inside of the hat.
Row 56. Wk 1hdc through each st including the unworked sts of row 51all the way around and FO (like in the photo's below).


To make the buckle: with Gold Yarn & G Hook
Ch29 join & ch1
Row 1. 1sc 6, 3sc, 1sc in 6, 3sc, 1sc in 6, 3sc, 1sc in 6, 3sc, join & ch1.
Row 2. 1sc in each st around and FO.
Attach yarn in the center at the top of ch29, ch enough to reach to the bottom and wk 1slst into the ch and FO.
To make the hat band: with Black Yarn & G Hook
Ch91
Row 1. 1sc in 90, ch1 & turn.
Rows 2-6. Repeat row 1, FO at the end of row 6.
Slide the belt buckle through and sew the two ends together.
 Size Toddler/Sm. Child
Materials used to make BROBEE Hat:
Red Heart Yarns in Glowworm
Dark Green
Red
Other Materials used:
Needle & Red/Black Thread
Poly Fiber Fill
Glue
Hooks used: H, G
To make the BROBEE hat: with Glowworm Yarn & H Hook
Ch3
Row 1. wk 8hdc in the 3ch from the hook.
Row 2. 2hdc in each st around-16sts.
Row 3. 1hdc, 2hdc in the next st around-24sts.
Row 4. 1hdc in 2, 2hdc in the next st around-32sts.
Row 5. 1hdc in 3, 2hdc in the next st around-40sts.
Row 6. 1hdc in 4, 2hdc in the next st around-48sts.
Row 7. 1hdc in 13, 2hdc in the next st around-60sts.
Row 8. 1hdc in 60sts.
Rows 9-17. repeat row 8
Change to Dark Green
Row 18. 1hdc in each st around.
Rows 19-20. repeat row 18 and FO (I like the color change in the back).
Make ear flaps: change to Glowworm
Row1. 1hdc in 12sts, ch2 & turn.
Row 2. dec1hdc, 1hdc 8sts, dec1hdc, ch2 & turn.
Change to Dark Green
Row 3. 1hdc in 10sts, ch2 & turn.
Row 4. dec1hdc, 1hdc in 6, dec1hdc, ch2 & turn.
Change to Glowworm
Row 5. 1hdc in 8sts, ch2 & turn.
Row 6. dec1hdc, 1hdc in 4, dec1hdc, ch2 & turn.
Change to Dark Green
Row 7. 1hdc in 6sts, ch2 & turn.
Row 8. dec1hdc, 1hdc in 2, dec1hdc, ch2 & turn.
Change to Glowworm
Row 9. dec1hdc, dec1hdc, ch2 & turn.
Row 10. dec1hdc and FO.
Skip 24sts and make the 2nd ear flap repeating rows 1-10
Once both ear flaps are done, attach red yarn with a slst and wk 1sc all the way around the entire hat including ear flaps and FO.
Use a stitch marker
To make the red spikes: with Red Yarn & G Hook (make 3)
Ch2
Row 1. 6sc in the 2nd st from the hook.
Row 2. 2sc in each st around-12sts.
Rows 3-4. 1sc in 12sts
Row 5. 1sc, 2sc in the next st-18sts.
Rows 6-7. 1sc in 18sts
Row 8. 1sc in 2, 2sc in the next st-24sts.
Rows 9-10. 1sc in 24sts and FO.
Stuff the spikes lightly and sew to the top of the hat.
To make the eyebrow: with Black Yarn & G Hook
Ch23
wk 1slst in 22sts and FO.
Sew just a little bit below the spikes.
To make the mouth: with Red Yarn & G Hook
Ch25
Row 1. 1sc 23, 3sc in the last st, now working on the other side of the chain, 1sc in 22, 2sc in the last st and FO.
With a tapestry needle and black yarn weave in a black line in the middle of the red mouth. Sew the mouth in place.
To make the strands for the Pom-Poms to hang from: with Dark Green Yarn & G Hook (make 2)
Attach yarn to the bottom of the ear flaps with a slst & ch1, wk 1sc into the same st as the slst, ch21, wk 1slst in 20sts, wk another slst into the same st as the first sc to join and FO.
Make 2 pom-poms: I wrapped 1 strands of yarn Glowworm & Red together about 160x.
To make the eyes: with white felt cut-out 2 oval shapes, then cut-out a black oval shape just a tiny bit bigger than the white one. If sewing put the black under the white oval and sew in place. If using hot glue, glue the black oval to the hat, glue the black small center piece to the white oval. With a clear drying glue, glue the white oval on top of the black oval.
BROBEE Hat

Materials used to make BROBEE Hat:
Red Heart Yarns in Glowworm
Dark Green
Red
Other Materials used:
Needle & Red/Black Thread
Poly Fiber Fill
Glue
Hooks used: H, G
To make the BROBEE hat: with Glowworm Yarn & H Hook
Ch3
Row 1. wk 8hdc in the 3ch from the hook.
Row 2. 2hdc in each st around-16sts.
Row 3. 1hdc, 2hdc in the next st around-24sts.
Row 4. 1hdc in 2, 2hdc in the next st around-32sts.
Row 5. 1hdc in 3, 2hdc in the next st around-40sts.
Row 6. 1hdc in 4, 2hdc in the next st around-48sts.
Row 7. 1hdc in 13, 2hdc in the next st around-60sts.
Row 8. 1hdc in 60sts.
Rows 9-17. repeat row 8
Change to Dark Green
Row 18. 1hdc in each st around.
Rows 19-20. repeat row 18 and FO (I like the color change in the back).
Make ear flaps: change to Glowworm
Row1. 1hdc in 12sts, ch2 & turn.
Row 2. dec1hdc, 1hdc 8sts, dec1hdc, ch2 & turn.
Change to Dark Green
Row 3. 1hdc in 10sts, ch2 & turn.
Row 4. dec1hdc, 1hdc in 6, dec1hdc, ch2 & turn.
Change to Glowworm
Row 5. 1hdc in 8sts, ch2 & turn.
Row 6. dec1hdc, 1hdc in 4, dec1hdc, ch2 & turn.
Change to Dark Green
Row 7. 1hdc in 6sts, ch2 & turn.
Row 8. dec1hdc, 1hdc in 2, dec1hdc, ch2 & turn.
Change to Glowworm
Row 9. dec1hdc, dec1hdc, ch2 & turn.
Row 10. dec1hdc and FO.
Skip 24sts and make the 2nd ear flap repeating rows 1-10
Once both ear flaps are done, attach red yarn with a slst and wk 1sc all the way around the entire hat including ear flaps and FO.
Use a stitch marker
To make the red spikes: with Red Yarn & G Hook (make 3)
Ch2
Row 1. 6sc in the 2nd st from the hook.
Row 2. 2sc in each st around-12sts.
Rows 3-4. 1sc in 12sts
Row 5. 1sc, 2sc in the next st-18sts.
Rows 6-7. 1sc in 18sts
Row 8. 1sc in 2, 2sc in the next st-24sts.
Rows 9-10. 1sc in 24sts and FO.
Stuff the spikes lightly and sew to the top of the hat.
To make the eyebrow: with Black Yarn & G Hook
Ch23
wk 1slst in 22sts and FO.
Sew just a little bit below the spikes.
To make the mouth: with Red Yarn & G Hook
Ch25
Row 1. 1sc 23, 3sc in the last st, now working on the other side of the chain, 1sc in 22, 2sc in the last st and FO.
With a tapestry needle and black yarn weave in a black line in the middle of the red mouth. Sew the mouth in place.
To make the strands for the Pom-Poms to hang from: with Dark Green Yarn & G Hook (make 2)
Attach yarn to the bottom of the ear flaps with a slst & ch1, wk 1sc into the same st as the slst, ch21, wk 1slst in 20sts, wk another slst into the same st as the first sc to join and FO.
Make 2 pom-poms: I wrapped 1 strands of yarn Glowworm & Red together about 160x.
To make the eyes: with white felt cut-out 2 oval shapes, then cut-out a black oval shape just a tiny bit bigger than the white one. If sewing put the black under the white oval and sew in place. If using hot glue, glue the black oval to the hat, glue the black small center piece to the white oval. With a clear drying glue, glue the white oval on top of the black oval.
Happy St Patricks Day to All!!
Connie’s Spot©
Connie Hughes Designs©
Connie Hughes Owner/Designer
Characters, Photos, Patterns & Designs
Are Copyright Protected All Rights Reserved.