"New Free Crochet Pattern"
Cylinder Clutch Bag Pattern©
By Connie Hughes Designs©
Cylinder Clutch Bag Pattern©
By Connie Hughes Designs©
This little purse is really easy to make and can be made quickly....
perfect for a little girl or a slightly older one.
perfect for a little girl or a slightly older one.
This little bag could easily be made into a real evening bag...
just use a really pretty yarn and a more mature button...
get yarn to match your dress and it's the Perfect Prom Dress Bag!
just use a really pretty yarn and a more mature button...
get yarn to match your dress and it's the Perfect Prom Dress Bag!
The finished bag measures about 8" long
Materials and Yarns used to make these Bags:
Red Heart Kids Beach
Red Heart Bonbon Print
Bright Pink
White
2 1" Buttons
Hooks Used:
G, F
To make the Bag: with a G Hook
To make the sides of the bag a little more sturdier make 2 for each side.
Ch2
Row 1. 6sc in the 2nd st from the hook.
Row 2. 2sc in each st-12sts.
Row 3. 1sc, 2sc in the next st-18sts.
Row 4. 1sc in 2, 2sts in next st-24sts.
Row 5. 1sc in 3, 2sc in next st-30sts.
Row 6. 1sc in 4, 2sc in next st-36sts.
Row 7. 1sc in 5, 2sc in next st-42sts.
Row 8. 1sc in 6, 2sc in next st-48sts.
When you have both done work 1sc through both pieces.
Row 9. 1sc in the FLO in each st, join & ch1-48sts.
Row 10. 1sc in each st, join & ch1-48sts.
Rows 11-14. repeat row 10
To make the opening
Row 15. wk 1sc in each st, do not join, ch1 & turn.
Repeat row 15 until it measures about 61/2 inches.
Join the 2 sides together with a slip stitch, ch1, wk 1sc in each st around.
Repeat rows 11-14 and FO.
Once you have the bag done sew the other side in place to seal up the bag.
(I meant to put the Bright Pink side on the outside of the bag...but I forgot and by the time I noticed what I had done...I was to far into it to change it).
To make the Flap: with a G Hook
Attach yarn to one side of the opening (like in the photo below) with a sl st and ch1.
Row 1. wk 1sc across one side of the opening, ch1 & turn.
Row 2. dec1sc, wk 1sc in each st across, decreasing the last 2sts, ch1 & turn.
Repeat row 2 until you have 4sts total.
To make the Button Hole:
Ch5, wk 1sl st in the last st, ch1 and wk 1sc in each ch and FO.
With the same color or with a contrasting color, wk 1sc around the flap.
To make the handle: with a G or F Hook
Ch2
Row 1. wk 4sc in the 2nd st from the hook.
Row 2. 2sc in each st-8sts.
Row 3. 1sc in each st-8sts.
To make the handle on the White Bag repeat row 3 until it measures about 11 or 12 inches, you can stuff it lightly as you work.
To make the handle on the Blue & Pink Bag repeat row 3 until it measures about 6 or 7 inches.
This completes my super easy Free Cylinder Bag Pattern©.
I hope who ever your making them for loves
them as much as I loved making them!
If you have any questions please feel free to email me @
them as much as I loved making them!
If you have any questions please feel free to email me @
conniehughes212@gmail.com
This pattern is for personal use.
Characters, Photos, Patterns & Designs Copyright Protected
All Rights Reserved.
Connie's Spot© Connie Hughes Designs©
Thanks for Supporting Connie's Spot© Sponsors!!
This pattern is for personal use.
Characters, Photos, Patterns & Designs Copyright Protected
All Rights Reserved.
Connie's Spot© Connie Hughes Designs©
Thanks for Supporting Connie's Spot© Sponsors!!
I am celebrating my 34th Wedding Anniversary tomorrow!
My husband asked me where I wanted to go and every time he asks me that...
I give him the same answer...the BEACH...so that's where we're going!!
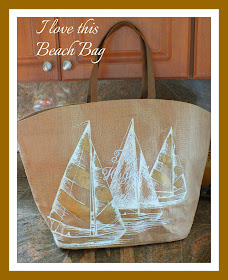
I got this Beach Bag from one of Connie's Spot© Sponsors on my blog...
(if you decide to get this bag and put your name on it...
get it in a different color than white it blended in)
It is an awesome bag and it's so big inside...I have
2 big beach bags, 1 blanket, my writing journal and there's
plenty of room for both of our flip flops!
The bag is fully lined
so if I get sand inside I can just shake it out and go!


No comments:
Post a Comment